Mounting USB Drives on Raspberry Pi: Desktop, Command Line and fstab
- Published
- Author
- Patrick Fromaget
- Reads
- 940
Raspberry Pi OS Desktop usually mounts USB drives on its own. Minimal systems need a manual mount, or a UUID entry in /etc/fstab to mount at every boot.
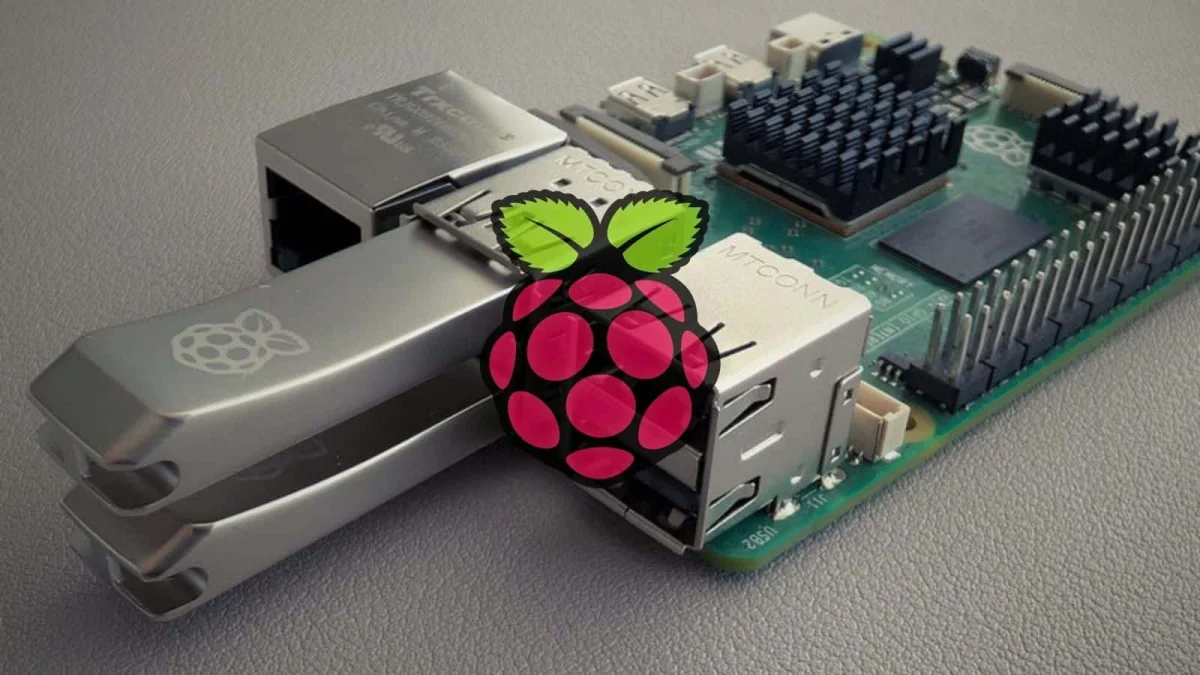
Desktop Raspberry Pi OS will usually mount a USB drive the moment you plug it in. When it doesn't, the fix is a single mount command, and a few extra steps will make that mount survive reboots. Most of the confusion comes from Linux not labeling anything for you, so the job is mostly knowing which device is which.
There are two routes here. The first is the automatic one, which suits anyone running the desktop and wanting a drive that just appears in the file manager. The second is manual, which you'll need on minimal systems or whenever the desktop doesn't mount a drive. Past that, you can make a manual mount persistent, either through a helper script or by adding an entry to /etc/fstab.
Hardware and power first
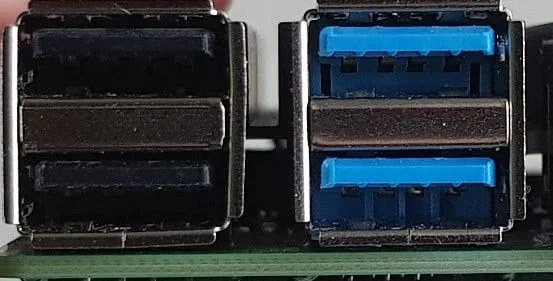
The Raspberry Pi 4 is the model this walkthrough assumes. If you have a recent board, plug the drive into one of the blue USB 3 ports. The black ports work, but they're slower. Keep keyboards, mice and other accessories on the black ports so the faster ports are free for storage.
Power is the usual failure point with larger external drives. If you see the message "Under-voltage detected!", the drive is drawing more current than the Pi can supply on its own. A powered USB hub fixes this. Plug the hub into the Pi and the drive into the hub. Drives with their own power supply can skip this step.
Flash drives and portable SSDs both work. A flash drive is handy for installing or moving distributions, while an external SSD is close to the Pi's size and noticeably faster for sustained reads and writes. The price gap between SSDs and traditional spinning drives has narrowed, which makes SSDs a sensible default for storage on a Pi.
Preparing Raspberry Pi OS
This process works on any recent Raspberry Pi OS release and on most Linux distributions. Commands are written for Debian-based systems, so adjust the package commands if you're on something else. Update the system before you start:
sudo apt updatesudo apt upgrade
If your drive uses NTFS, the filesystem Windows uses by default, you'll need the ntfs-3g driver. Installing it is harmless if you already have it, and the package manager will tell you when it's present:
sudo apt install ntfs-3g

Method 1: automatic mounting on the desktop
On a graphical desktop, plugging in a USB drive triggers detection and mounting through the file manager. You don't need to type anything.
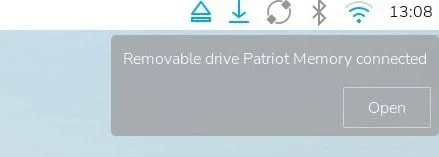
A notification appears in the top right of the screen. Click Open and the file manager shows the drive's contents. Behind the scenes, the drive is mounted under /media/{username}/{drivename}. In the example used here, that path is /media/pat/CES_X64FREO.
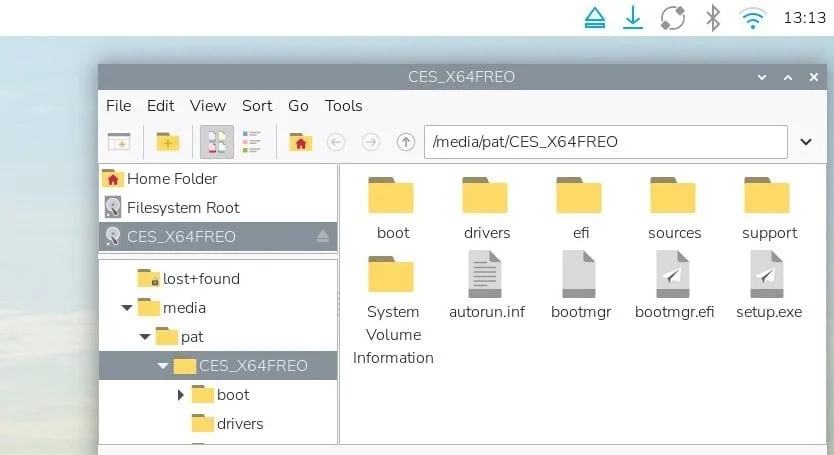
Once mounted, the drive behaves like any other folder. You can copy, move, rename or delete files as usual. The same path works from the terminal, so you can point a shell command at it directly.

Ejecting on the desktop
Click the eject button next to the drive in the file manager. Close any windows that have files open on the drive first, because the eject will fail if something is still using it. When the eject completes, unplug the drive.
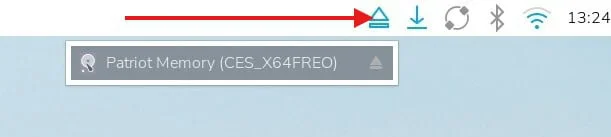
Other desktop environments handle this differently in the details, but the pattern holds: plug in, let the system mount, use the drive, then eject before unplugging.
Method 2: mounting from the command line
Minimal systems and some desktops won't mount a drive automatically. In that case you do it by hand in three steps: identify the device, create a mount point, and mount the device to that folder.
Finding the device name
fdisk is the standard Linux tool for listing and managing disks. Run it with the list option to show every disk the system can see:
sudo fdisk -l
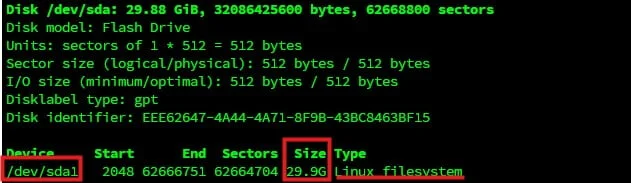
The USB drive usually appears near the end of the output. Two things help you pick the right entry. Check the size, since the author here identified a 32GB flash drive that way. If you're still unsure, unplug the drive, run the command again, and see which entry disappears. In this example the device is /dev/sda1, and you'll need that name for the mount command.
If nothing shows up, the drive may not have a partition yet. Jump to the troubleshooting section below.
Creating a mount point
Linux expects a directory to mount into. Conventionally that's somewhere under /mnt or /media. This walkthrough uses /mnt/usb:
sudo mkdir /mnt/usb
Mounting the drive
The general syntax is:
sudo mount <DEVICE> <FOLDER> -o <OPTIONS>
For this example, with the user pat, the full command is:
sudo mount /dev/sda1 /mnt/usb -o uid=pat,gid=pat
Replace pat with your own username. The uid and gid options set the owner of the mounted files to your user. Without them, you can still mount with mount /dev/sda1 /mnt/usb, but you'll need root privileges to write to the drive. Setting ownership at mount time avoids that.
Verify the mount by listing the contents and creating a test file:
ls -latr /mnt/usbtouch /mnt/usb/test
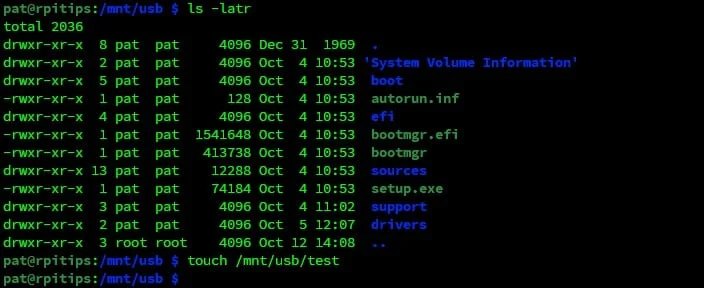
If both commands run without errors and the files belong to your user, the drive is ready.
Unmounting from the command line
When you're finished, unmount the drive before unplugging it. Use the mount point, not the device:
sudo umount /mnt/usb
Replace /mnt/usb with whatever folder you chose. Unplugging without unmounting can leave files half-written, so get into the habit of running this first.
No partition on the drive?
A new drive or one used in another system may have no partition table. The fix depends on what you have available. On a desktop Pi, GParted is the easiest route, and Windows can do the same job. GParted is a graphical partition editor, and the desktop installation is covered in the source's separate guide.
On Raspberry Pi OS Lite, which has no desktop, you can format from the command line with mkfs:
sudo mkfs -t fat32 /dev/sda1
This step erases everything on the target partition. Double-check the device name with fdisk -l before you run it, because a wrong device name here means losing data on a different disk.
Auto-mounting on a minimal system with fstab
Manual mounting works, but on a minimal system you'd repeat it after every reboot or replug. If the drive stays connected, a persistent entry is the better option. You can tell the system to mount it at boot by listing it in /etc/fstab, the file that defines filesystems mounted at startup.
Use the drive's UUID instead of its device name. The device name depends on the order in which the system detects drives. With several USB drives connected, sda1 may refer to a different drive after a reboot. A UUID is assigned when the disk is formatted, which makes it a stable identifier.
To find it, run:
sudo lsblk -f
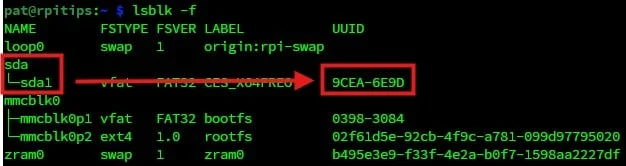
Find the row for your drive, note the UUID, and check the filesystem type in the FSTYPE column. You'll need both.
Adding the fstab entry
Open the file in an editor:
sudo nano /etc/fstab
Add a line at the end. The example from the source is:
UUID=0DEC-3E3A /mnt/usb vfat uid=pat,gid=pat 0 0
Replace the UUID with your drive's value and the usernames with your own. Change vfat to match your filesystem. Common choices are vfat for FAT32, ext4 for Linux filesystems and ntfs for Windows drives. Save with CTRL+X, confirm the write, and reboot.

A malformed fstab line can cause boot problems, so double-check each field before saving. Once the system restarts, the drive should appear in /mnt/usb. If you unplug and replug it after boot, run mount -a to process the fstab entries, or mount /mnt/usb to mount that one folder directly.
The fstab approach also scales. You can add one entry per drive with its own mount point, such as /mnt/big_drive or /mnt/kingston_key, and each will be identified by its own UUID.
A script and alias instead of fstab
If you'd rather not have a drive mount at every boot, a script you run on demand is the alternative. It keeps the mount manual but removes the typing.
Create the script:
sudo nano /usr/local/bin/usb-connect.sh
Paste in these lines:
#!/bin/bashsudo mount /dev/sda1 /mnt/usb -o uid=pat,gid=patecho "USB drive mounted successfully"
Save and exit with CTRL+O and CTRL+X. Then make it executable:
sudo chmod +x /usr/local/bin/usb-connect.sh
To avoid typing the full path, add an alias to your shell configuration. Open ~/.bashrc:
nano ~/.bashrc
Add this line at the end:
alias usbmount='/usr/local/bin/usb-connect.sh'
Save, then close the terminal or end your SSH session so the change takes effect. From then on, plugging in the drive and running usbmount is all it takes.
The script hardcodes /dev/sda1, so it has the same device-order weakness as a manual mount. If you use more than one USB drive, switch the script to the UUID approach or confirm the device name with fdisk -l first.
What to take from this
On a desktop, let the file manager do the work and use the eject button when you're done. On a headless or minimal system, the mount itself is one command. What takes more thought is persistence. If the drive stays plugged in, an fstab entry keyed to the UUID is the most reliable setup, because it identifies the drive by something that won't change with device order. If you only need the drive occasionally, the script and alias keep things simple. In either case, unmount before you unplug, and check the device name before you format anything.