So, you’re staring at that big, plump chicken breast, dreaming of a delicious, speedy dinner, but then reality hits: it’s THICK. And you know what that means, right? Uneven cooking, dry edges, and a whole lotta waiting. Ugh. But what if I told you there’s a super simple hack to turn that chicken brick into beautiful, thin cutlets, making your weeknight dinners faster, tastier, and way less frustrating? Buckle up, buttercup, because we’re about to make you a chicken-cutting ninja!
Why This Skill Is Awesome (Seriously)
Okay, so maybe “awesome” is a strong word for slicing chicken, but hear me out. This isn’t just about cutting; it’s about **culinary empowerment**. Here’s why this “recipe” (if you can even call it that, it’s more like a life hack) is your new best friend:
- **Speed Demon:** Thin cutlets cook SO much faster. We’re talking minutes, not a whole episode of your favorite show.
- **Even Cooking FTW:** No more dry edges while the middle is still suspiciously pink. Cutlets cook evenly, every single time.
- **Flavor Bomb:** More surface area means more room for seasoning, marinades, or that glorious breading you’re dreaming of. Yum!
- **Budget-Friendly Brilliance:** Why buy pricey pre-cut cutlets when you can make them yourself from regular chicken breasts? You’re basically saving money while flexing your kitchen skills. Win-win!
- **It’s Idiot-Proof:** Seriously, if I can do it without losing a finger or creating a chicken massacre, you absolutely can too.
Ingredients You’ll Need (Spoiler: It’s Not Many)
Think of these as your trusty tools, not ingredients for a complex stew. Because, well, it’s just chicken and a few essentials.
- **Boneless, Skinless Chicken Breasts:** The stars of our show! Grab a couple, fresh is best.
- **A Sharp Knife:** And I mean SHARP. This is non-negotiable, folks. A dull knife is a dangerous knife (and a messy one). Your chef’s knife or a long, thin slicing knife will work wonders.
- **A Sturdy Cutting Board:** Give your chicken a stable stage to perform on.
- **Paper Towels:** For patting dry and general clean-up. Because nobody likes a slippery situation.
- **(Optional) Plastic Wrap & Meat Mallet/Rolling Pin:** If you want those cutlets SUPER thin and perfectly uniform.
Step-by-Step Instructions (Let’s Get Slicing!)
- **Pat ‘Em Dry:** First things first, grab those chicken breasts and pat them down with paper towels. Seriously, **don’t skip this step**. Less moisture means less slipping and cleaner cuts.
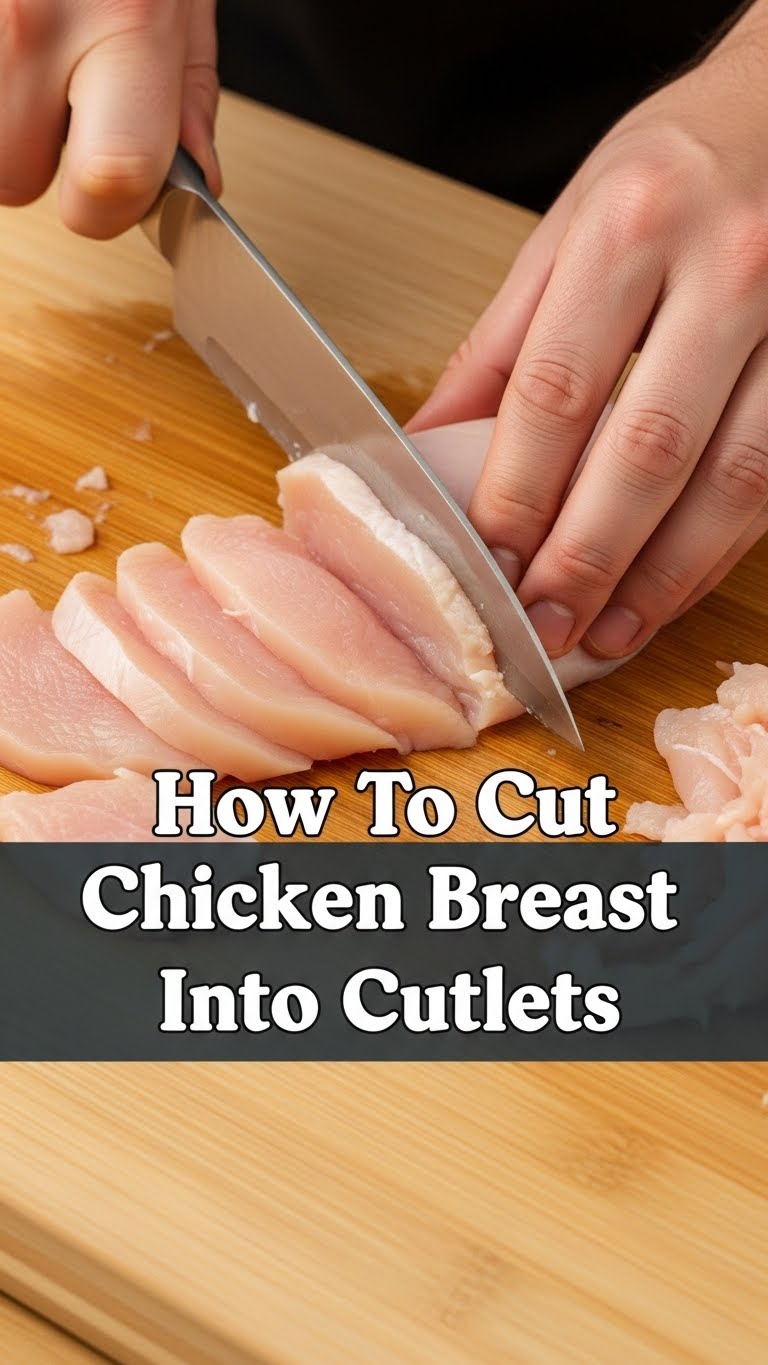
- **Position for Success:** Lay one chicken breast flat on your cutting board. Orient it so the thicker, rounded side is facing you, and the pointy, thinner end is away.
- **The Magic Slice (The Horizontal Hustle):** Place your non-dominant hand firmly but gently on top of the chicken breast to hold it steady. Now, with your sharp knife, start slicing horizontally through the thickest part of the breast. Keep your knife parallel to the cutting board.
- **Go Slow & Steady:** Use a long, smooth sawing motion (think delicate, not aggressive). Work your way from one side of the breast to the other, keeping the knife as level as possible. Your goal is to split the breast into two thinner, even pieces. **Pro tip: Use the length of your knife blade, not just the tip.**
- **Repeat & Rejoice:** Once you’ve got two lovely cutlets, repeat the process with the remaining chicken breasts. See? Easy peasy!
- **(Optional) Pound It Out:** If you want those cutlets even thinner and tender, place them between two pieces of plastic wrap. Then, gently pound them with a meat mallet or a rolling pin until they’re your desired thickness. This also helps with super even cooking.
Common Mistakes to Avoid (Learn From My “Oops” Moments)
Nobody’s perfect, but we can definitely learn from the errors of others (or our past selves). Here are some pitfalls to dodge:
- **The Dull Knife Disaster:** Trying to cut chicken with a dull knife is like trying to jog through quicksand. It’s frustrating, messy, and potentially dangerous. **Always use a sharp knife!**
- **The Slip-and-Slide Scenario:** Not patting your chicken dry beforehand. Water equals slippery, slippery equals uneven cuts (and a higher risk of an accidental slice where you don’t want one).
- **The “Sawing Like a Lumberjack” Syndrome:** You’re not cutting down a tree! Use long, smooth, deliberate strokes. Short, choppy movements will give you jagged, uneven cutlets.
- **Going Too Thin (or Too Thick):** Aim for roughly 1/2 to 3/4 inch thickness for most recipes. Too thin, and they’ll cook in a blink and dry out. Too thick, and… well, that defeats the purpose, doesn’t it?
- **Ignoring the Gristle/Tendons:** Take a quick peek for any tough white tendons or bits of gristle before you start. It’s easier to remove them from the whole breast.
Alternatives & Substitutions (Because Life Happens)
So, what if you’re feeling adventurous, or just don’t have exactly what I mentioned?
- **”Can I use boneless, skinless chicken thighs?”** Absolutely! Thighs are naturally thinner and don’t always need splitting, but you can definitely slice them for even quicker cooking or to make smaller pieces.
- **”No meat mallet? What do I do?”** A rolling pin, the bottom of a heavy skillet, or even a sturdy wine bottle (just make sure it’s clean!) can double as a mallet. Get creative!
- **”What if my chicken breasts are super small?”** You might not need to cut them into two. If they’re already relatively thin, a quick pound might be all they need to reach “cutlet” status. Use your judgment!
FAQ (Frequently Asked Questions, with a Twist)
Got burning questions? I got answers (and maybe a little sass).
- **”Why bother cutting them myself? Can’t I just buy pre-cut cutlets?”** Well, technically yes, but why pay extra for something you can do in 30 seconds? **Plus, you get to feel like a kitchen boss!**
- **”Can I do this with frozen chicken?”** Uh, no. Please, for the love of all that is holy, **fully thaw your chicken** before attempting this. Frozen chicken is a solid block of frustration and dull knives.
- **”What kind of knife is BEST?”** A sharp chef’s knife (8-10 inches) or a boning knife (which is typically thinner and more flexible) are your best bets. The key is sharp and long enough to make a single, clean pass.
- **”How thick should my cutlets be?”** Aim for around 1/2 to 3/4 inch for most recipes. Thinner for super-fast frying, slightly thicker if you plan to stuff them.
- **”Can I do this with other meats, like pork?”** You betcha! This technique works beautifully for pork tenderloin, too. Hello, speedy pork medallions!
- **”Do I REALLY need to pound them after slicing?”** Not strictly, no. But pounding helps ensure **super even thickness**, which means even more predictable cooking and often more tender results. Think of it as an extra step towards perfection.
- **”How do I store my freshly cut cutlets?”** Just like regular chicken! Pop them in an airtight container in the fridge for 2-3 days, or freeze them individually wrapped for longer storage.
Final Thoughts (Go Forth and Conquer!)
And there you have it! You’ve officially leveled up your kitchen game. No more sad, unevenly cooked chicken. You’re now equipped to turn those chunky breasts into beautiful, quick-cooking cutlets that are perfect for pan-frying, grilling, breading, or whatever deliciousness you’re dreaming up. Now go forth and impress someone—or yourself—with your new culinary skills. You’ve earned it!