So you’re staring at that chicken breast in the fridge, wondering how to make it less… boring? And you’re also kinda starving but don’t want to spend an eternity in the kitchen, huh? Same, friend. Same. Well, grab your apron (or just a clean shirt, no judgment here) because we’re about to make some Hasselback Chicken Breast that’s so good, it’ll make you feel like a culinary wizard without actually having to do any wizardry. ✨
Why This Recipe is Awesome
Okay, let’s be real. Chicken breasts can be pretty… meh. Bland, dry, the poster child for “healthy but boring” dinners. But not today, my friend, not today! This Hasselback Chicken Breast recipe takes those sad, flat fillets and turns them into a glorious, flavor-packed masterpiece that looks fancy AF but is secretly idiot-proof. Seriously, I didn’t mess it up, so your chances are pretty darn good.
- It looks like you spent hours, but it’s actually a quick weeknight win.
- It’s practically impossible to get dry chicken when it’s stuffed with cheesy, garlicky goodness. Hello, juicy town!
- Super versatile – you can stuff it with whatever leftover bits are hanging out in your fridge. Think of it as a choose-your-own-adventure for your taste buds.
- The “hassle” in Hasselback is just for show; the actual process is unbelievably easy.
Ingredients You’ll Need
Time to gather your edible treasures! Don’t worry, nothing too exotic here. We’re keeping it simple, savory, and satisfying.
- Boneless, Skinless Chicken Breasts: About 2 large ones (6-8 oz each). The main act, obviously. Choose plump ones for maximum stuffing potential!
- Butter: 2 tablespoons, melted. Because everything is better with butter, duh.
- Garlic: 2-3 cloves, minced. Your best friend in the kitchen. Don’t be shy!
- Fresh Herbs: 1 tablespoon, chopped. Think parsley, chives, thyme, or rosemary. Whatever’s looking perky in your fridge. Dried works too, just use less.
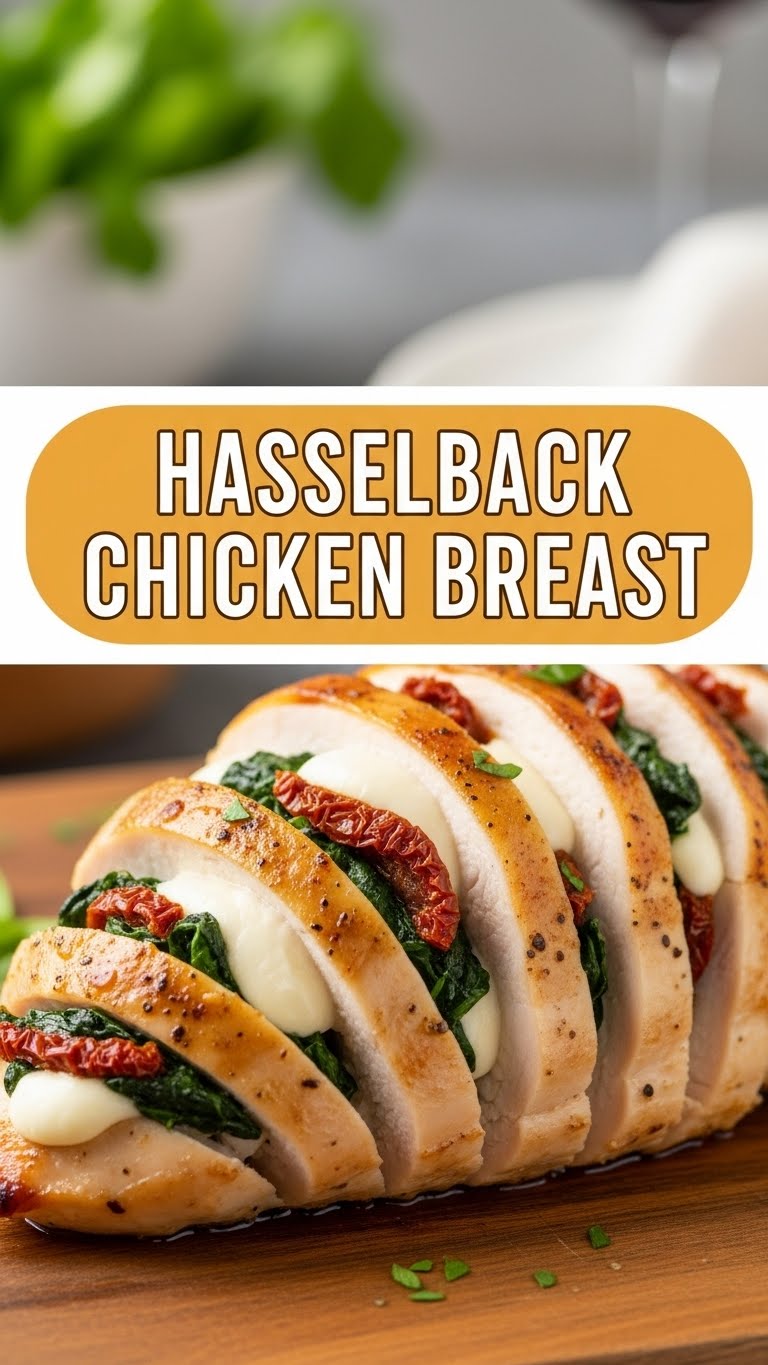
- Cheese: 1/2 cup, shredded. Mozzarella, cheddar, provolone, a mix – whatever makes your heart sing. **This is non-negotiable for max deliciousness.**
- Optional Fillings: A handful of fresh spinach, sun-dried tomatoes (chopped), cooked bacon bits. Get creative!
- Salt & Black Pepper: To taste. The OG seasoning duo.
- Olive Oil: A drizzle, just for good measure.
Step-by-Step Instructions
Alright, let’s turn that chicken into a culinary work of art. Follow these simple steps and prepare to be amazed!
- Preheat & Prep: First things first, crank up your oven to 400°F (200°C). Then, pat your chicken breasts super dry with paper towels. This helps with browning and flavor adhesion. Place each breast on a cutting board.
- Slice & Dice (Carefully!): Here’s the “Hasselback” part. Place a chicken breast between two wooden spoon handles or chopsticks. This acts as a guide to prevent you from cutting all the way through. Using a sharp knife, make even slices (about 1/4 inch apart) across the chicken breast, going almost, but not quite, all the way through. You want pockets, not separate slices!
- Butter Up: In a small bowl, melt your butter. Stir in the minced garlic, chopped herbs, and a pinch of salt and pepper. This is our magic flavor potion.
- Brush & Fill: Place the hasselbacked chicken breasts in a lightly greased baking dish. Drizzle a little olive oil over them. Now, generously brush that garlic herb butter mixture all over each chicken breast, making sure to get it into all those beautiful little slices. Carefully tuck shredded cheese (and any other optional fillings like spinach or sun-dried tomatoes) into each cut. Don’t overstuff, but be generous!
- Bake It ‘Til Golden: Pop the baking dish into your preheated oven. Bake for 20-25 minutes, or until the chicken is cooked through and the cheese is bubbly and golden. **Key tip: A meat thermometer should read 165°F (74°C) at the thickest part.**
- Rest, You Deserve It: Once cooked, take the chicken out of the oven. Loosely tent it with foil and let it rest for 5-10 minutes. This is CRUCIAL for juicy chicken. Don’t skip it, I’m watching you!
- Serve & Conquer: Garnish with a little extra fresh parsley if you’re feeling fancy. Serve hot with your favorite side dish. Get ready for applause (or at least satisfied grunts).
Common Mistakes to Avoid
Nobody’s perfect, but we can definitely avoid these common pitfalls that turn a masterpiece into… well, a mess. Learn from my potential (and sometimes actual) blunders!
- Slicing All the Way Through: Rookies! If you cut through the chicken, it just becomes sliced chicken, not hasselback. Use those wooden spoon handles as your guardrails, friend.
- Not Preheating the Oven: Impatience is not a virtue here. A cold oven leads to uneven cooking and less glorious browning. **Always preheat!**
- Overcooking: This is the cardinal sin of chicken. Dry chicken is sad chicken. Invest in a meat thermometer; it’s a game-changer.
- Skipping the Rest Period: I know, you’re hungry! But letting the chicken rest allows the juices to redistribute, resulting in a much juicier, more tender bite. Patience, grasshopper.
- Being Shy with Seasoning: Don’t be afraid of salt, pepper, and those garlicky herbs. They bring the flavor party!
Alternatives & Substitutions
Got a bare pantry or just feeling adventurous? This recipe is super flexible! Here are some ideas to make it your own:
- Cheese Swap: No mozzarella? No problem! Use provolone, fontina, goat cheese (if you’re feeling fancy!), or even a sharp cheddar.
- Herb Hero: If fresh herbs are scarce, use dried! Just remember to use about a third of the amount (e.g., 1 teaspoon dried for 1 tablespoon fresh). Italian seasoning blend is a fantastic shortcut.
- Flavor Boosters: Stuff with a spoonful of pesto, some chopped sun-dried tomatoes, a sprinkle of red pepper flakes for a kick, or even some caramelized onions.
- Butter Alternatives: You *could* use olive oil instead of butter in the garlic mixture, but honestly, butter just adds that extra je ne sais quoi. **IMO**, butter always wins.
- Make it Spicy: Add a pinch of cayenne pepper or finely diced jalapeño to your stuffing mixture for some heat.
FAQ (Frequently Asked Questions)
Got questions? I probably have snarky, yet helpful, answers!
- What kind of chicken breasts should I use?
Go for boneless, skinless, about 6-8 ounces each. Thicker ones work best for slicing without tearing.
- How do I know when my chicken is cooked through?
The best way is with a meat thermometer! It should read **165°F (74°C)** in the thickest part. No pink, please!
- Can I prep this ahead of time?
Absolutely! You can slice, butter, and stuff the chicken, then cover and refrigerate it for up to 24 hours. Just add an extra 5-10 minutes to the baking time.
- My chicken turned out dry, what went wrong?
Oh no! Most likely, it was overcooked or you skipped the crucial resting step. Don’t worry, even the pros mess up sometimes. Try again, using that trusty thermometer!
- What can I serve with Hasselback chicken?
Roasted asparagus, a simple green salad, mashed potatoes, or some fluffy rice are all excellent choices. It’s pretty versatile!
- Can I use a different type of meat?
While this recipe is tailored for chicken, you could theoretically try this method with pork tenderloin or thicker fish fillets, adjusting cook times, of course. But for today, we’re sticking to our feathered friend.
- I don’t have fresh herbs. Can I use dried?
Yep! Just remember the rule of thumb: use about one-third of the amount for dried herbs compared to fresh. **FYI**, dried oregano or an Italian seasoning blend works great!
Final Thoughts
See? You just transformed a humble chicken breast into something worthy of a dinner party (or, let’s be honest, a solo Netflix binge). You didn’t even break a sweat, did you? This Hasselback Chicken is a testament to the fact that delicious, impressive meals don’t have to be complicated. Now go impress someone—or yourself—with your new culinary skills. You’ve earned it! Don’t forget to take a picture before you devour it all! Happy cooking, chef!