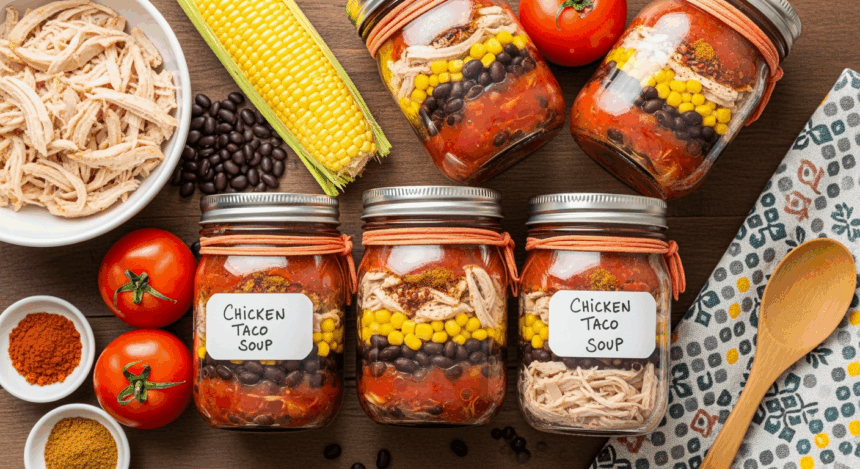
Ever stood in your kitchen, staring at your pantry thinking, “I wish I could just pop open a jar of homemade deliciousness instead of ordering takeout… again?” Well, friend, today’s your lucky day! We’re about to transform your “what’s for dinner?” panic into “I’m a meal prep genius” smugness with this canning chicken taco soup recipe. It’s like storing little jars of Mexican fiesta for those days when cooking feels as appealing as doing your taxes.
Why This Recipe is Awesome
Let me count the ways this canned chicken taco soup will revolutionize your life. First, it’s a “make once, eat a zillion times” situation—perfect for lazy cooks (I see you, and I am you). Second, it tastes even better after it’s been canned because all those flavors get cozy with each other. Third, you can literally have homemade soup ready in minutes when you’re hungry enough to consider eating the furniture. And lastly, it makes you look like a domestic goddess/god when you casually mention, “Oh this? Just some soup I canned myself.” *Hair flip*
Ingredients You’ll Need
Round up these bad boys:
- 4 pounds boneless, skinless chicken breasts (or thighs if you’re a “dark meat” rebel)
- 2 large onions, diced (tears are part of the cooking process, embrace them)
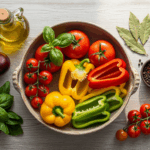
- 4 bell peppers, any colors (the more rainbow-like, the more Instagram-worthy)
- 6 cloves garlic, minced (or 10 if you’re keeping vampires away)
- 2 cans (15 oz each) black beans, drained and rinsed
- 2 cans (15 oz each) corn kernels, drained
- 2 cans (14.5 oz each) diced tomatoes
- 2 cans (10 oz each) Rotel tomatoes with green chilies
- 2 packets taco seasoning (homemade if you’re fancy, store-bought if you’re normal)
- 2 teaspoons cumin (because it’s not Mexican-inspired without cumin)
- 1 teaspoon oregano (the herb, not the state)
- 8 cups chicken broth (low sodium if your doctor has been giving you “the talk”)
- 1/4 cup lime juice (fresh squeezed earns you extra brownie points)
- Salt and pepper to taste (be generous, we’re not on a hospital diet here)
Step-by-Step Instructions
- Prep your workspace. Clear your kitchen like you’re expecting royalty. Sterilize your canning jars, lids, and bands by boiling them for 10 minutes. Set them aside on a clean towel feeling smug about your food safety knowledge.
- Cook that chicken. In a large pot, boil chicken until cooked through (about 15-20 minutes). Remove, let cool slightly, then shred it like you’re taking out some aggression on it. Set aside.
- Veggie time. In your largest pot (seriously, the biggest one you own), sauté those onions, bell peppers, and garlic until they’re soft and fragrant. This is where your house starts smelling like heaven.
- Combine the universe. Add your shredded chicken, black beans, corn, diced tomatoes, Rotel tomatoes, taco seasoning, cumin, oregano, and chicken broth to the pot. Stir it up, little darling, stir it up.
- Let it simmer. Bring the mixture to a boil, then reduce heat and simmer for about 30 minutes. Add lime juice in the last 5 minutes. The longer you let it simmer, the more the flavors meld, but don’t go wandering off to binge Netflix.
- Get your canner ready. Fill your pressure canner with the recommended amount of water and begin heating it up. Follow your canner’s instructions because they’re all slightly different (like snowflakes, but more dangerous if used incorrectly).
- Fill those jars. Ladle hot soup into sterilized quart jars, leaving 1-inch headspace. Run a knife around the inside to release air bubbles (they’re not welcome to this party).
- Seal ’em up. Wipe the rims clean with a damp cloth, place lids on jars, and screw on bands until fingertip tight. Don’t Hulk-smash them closed.
- Process those babies. Place jars in your pressure canner. Process quart jars at 10 pounds of pressure for 90 minutes (adjust for altitude if you’re living your best mountain life). Follow your canner’s specific instructions religiously.
- Cool down period. After processing, turn off heat and let pressure return to zero naturally. Wait 10 minutes after pressure drops, then carefully remove jars. No matter how impatient you are, resist the urge to rush this step.
- Check your handiwork. Let jars cool for 12-24 hours. You should hear satisfying “pings” as they seal. After cooling, check seals by pressing the center of each lid – if it doesn’t move, you’re golden!
Common Mistakes to Avoid
Even seasoned canners make boo-boos. Here are some classics:
- Skipping the pressure canner. Sorry folks, this is NOT a water bath canning recipe. Low-acid foods like chicken and beans need pressure canning to prevent becoming a science experiment gone wrong.
- Overfilling jars. That 1-inch headspace isn’t a suggestion – it’s a requirement. Overfill and you might be cleaning soup off your ceiling.
- Getting impatient with processing time. Those 90 minutes feel like forever, but don’t cut corners unless you enjoy food poisoning.
- Tightening bands too much. “Fingertip tight” means just that – not “channel your inner bodybuilder” tight.
- Forgetting to adjust for altitude. If you live above 1,000 feet, you’ll need to adjust pressure or processing time. Check your canner’s manual or you’ll be playing food safety roulette.
Alternatives & Substitutions
Not everyone’s pantry looks the same, so here are some swaps that won’t ruin everything:
- Protein swap: Ground beef or turkey works if chicken isn’t your jam. Brown it first, then proceed as normal.
- Bean variations: Pinto, kidney, or white beans can sub for black beans. Or go wild and use a mix – I won’t tell the bean police.
- Heat level: Mild Rotel too spicy? Use regular diced tomatoes. Need more fire? Add a diced jalapeño or three. Your sinuses, your choice.
- Veggie options: Zucchini, carrots, or celery can join the party, but they might get mushy after canning. FYI, I’ve found corn and peppers hold up the best.
- Broth alternatives: Vegetable broth works for a lighter flavor. Bone broth works for extra richness. Water works if you’re desperate (but why do that to yourself?).
FAQ (Frequently Asked Questions)
How long will these jars keep?
Properly processed and stored in a cool, dark place, your soup should remain safe and tasty for 12-18 months. Though honestly, they rarely last that long in my house because, you know… deliciousness.
Can I add cheese or cream before canning?
Absolutely not! Dairy products are a no-go for canning. Add those tasty finishing touches when you open and heat the soup. Otherwise, you’re asking for a science experiment instead of dinner.
I don’t have a pressure canner. Can I freeze this instead?
Yes! This soup freezes beautifully. Just cool completely, portion into freezer containers leaving room for expansion, and freeze for up to 3 months. Different method, same lazy-day meal solution.
Do I have to cook the chicken first?
Yes, raw chicken doesn’t can safely in this recipe. Don’t be tempted to skip this step unless you’re trying to win a “Worst Food Poisoning” contest.
Can I make this vegetarian?
Sure thing! Skip the chicken, use vegetable broth, and maybe add some extra beans or even diced sweet potatoes for substance. Just make sure to still pressure can it according to the same instructions.
My jars didn’t seal. What now?
Don’t panic! Just store those rebels in the fridge and use them within a week. Or reprocess them with new lids within 24 hours. It happens to the best of us.
Final Thoughts
Congratulations! You’ve just evolved from regular human to “person who can feed themselves during zombie apocalypse” status. There’s something incredibly satisfying about looking at those sealed jars of soup – like little trophies of adulting. Next time life gets chaotic and dinner seems impossible, you’ll smugly reach for a jar of your homemade chicken taco soup, heat it up, and top it with some fresh avocado, sour cream, and tortilla chips. Your future hungry self will thank your current motivated self. Now go forth and can – your pantry deserves this glow-up!
