So you’ve just stared into the fridge, sighed dramatically, and decided ‘Nope, not cooking anything complicated today!’? Been there, done that, bought the T-shirt. You want something crispy, satisfying, and shockingly easy, right? Well, friend, you’ve come to the right place. Get ready to elevate your chicken game without breaking a sweat (or a complex recipe).
Why This Recipe is Awesome
Because let’s be real, life’s too short for bland food or recipes that require a culinary degree. This fried chicken breast bread crumbs recipe is the ultimate weeknight (or ‘I’m feeling lazy but hungry’ weekend) hero. It’s quick, it’s delicious, and it basically wraps your taste buds in a warm, crispy hug.
Seriously, this isn’t gourmet; it’s **’I need delicious food NOW’** food. It’s so simple, it’s practically idiot-proof. Even I didn’t mess it up, and my kitchen skills are usually reserved for not burning toast. Plus, who doesn’t love crispy chicken? Exactly.
Ingredients You’ll Need
Gather ’round, my fellow food enthusiasts. Here’s what you’ll need for this culinary masterpiece (that’s not really a masterpiece, but tastes like one!):
- Chicken Breasts: About 2-3 boneless, skinless breasts. The stars of our show. Slice ’em thin or pound ’em flat – your call, boss.
- Plain Flour: Half a cup, give or take. The base layer for all that crispy goodness.
- Eggs: 2 large ones, beaten. These are our magical glue. Don’t skip them, unless you want naked chicken.
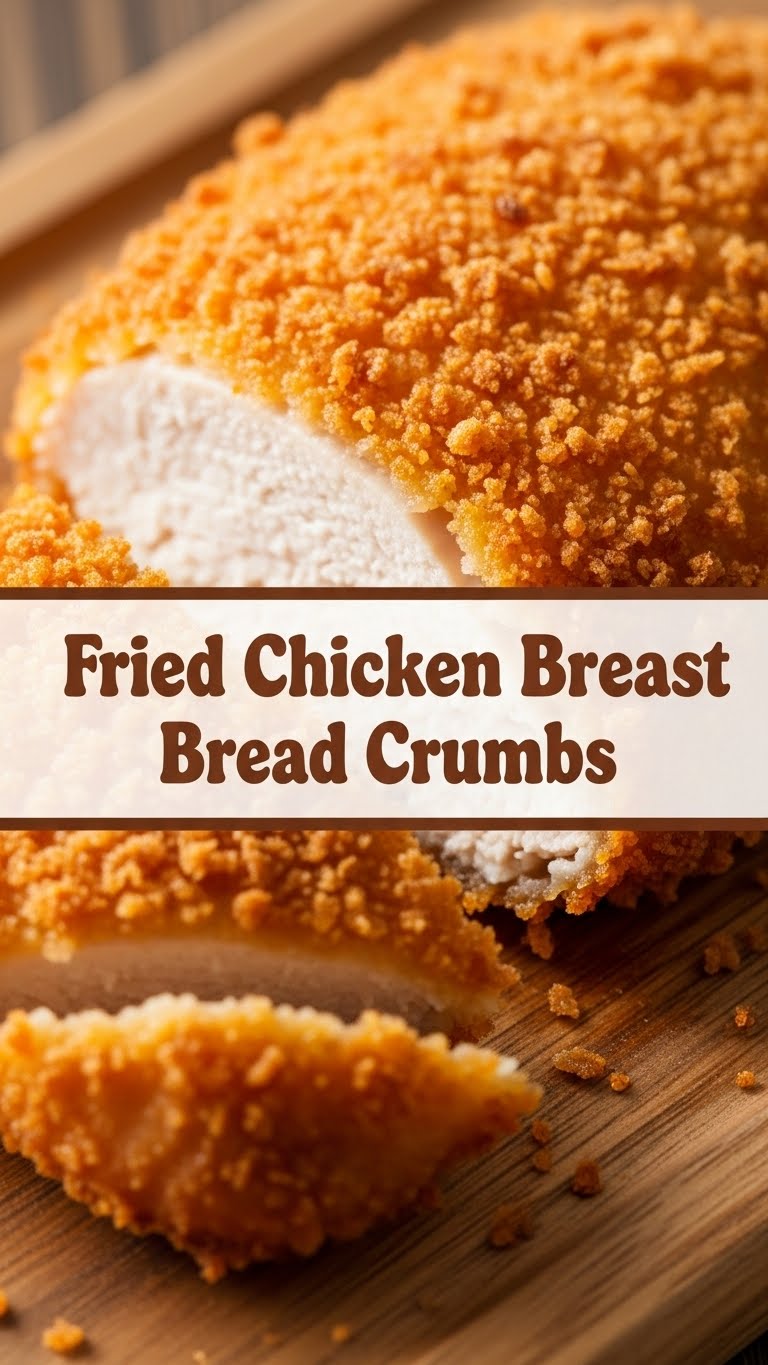
- Bread Crumbs: About 1-1.5 cups. Panko is my personal fave for extra crunch, but any kind will do. **Pro tip: if they’re a bit coarse, crush them slightly!**
- Salt & Black Pepper: To taste. Duh. Seasoning is life, people!
- Paprika (smoked or sweet): 1 tsp. For color and a little somethin’ extra.
- Garlic Powder: 1/2 tsp. Because everything’s better with garlic, IMO.
- Cooking Oil: Enough for shallow frying (about 1/2 inch in your pan). Vegetable, canola, sunflower – whatever you usually fry with. Just not olive oil, it has a low smoke point.
Step-by-Step Instructions
Alright, apron on (or not, we’re informal here), let’s get cooking!
- Prep Your Chicken: If your chicken breasts are thick, slice them horizontally to make thinner cutlets (about 1/2 inch thick). This ensures quicker and more even cooking. You can also pound them gently with a meat mallet (or a rolling pin, or a heavy pan—get creative!). **Even thickness is key!**
- Set Up Your Breading Stations: Grab three shallow dishes. In the first, put your flour, salt, pepper, paprika, and garlic powder. Mix well. In the second, beat your two eggs. In the third, pour your bread crumbs.
- The Dredging Dance: Take a chicken cutlet, coat it evenly in the seasoned flour (shaking off any excess). Then, dip it fully into the egg wash. Finally, transfer it to the bread crumbs, pressing firmly on both sides to make sure it’s completely coated. You want maximum crunch, right? Repeat for all chicken pieces.
- Heat That Oil: Pour your cooking oil into a large skillet or frying pan until it’s about 1/2 inch deep. Heat it over medium-high heat. You’ll know it’s ready when a tiny pinch of bread crumb sizzles immediately when dropped in.
- Fry Baby, Fry! Gently place the breaded chicken cutlets into the hot oil. Don’t overcrowd the pan; cook in batches if necessary. Fry for about 3-5 minutes per side, until they’re golden brown and cooked all the way through.
- Drain & Serve: Once golden and glorious, remove the chicken from the pan and place it on a wire rack set over paper towels. This drains excess oil and keeps ’em crispy. Let them rest for a minute or two.
Common Mistakes to Avoid
We’ve all been there. Here are a few rookie errors to dodge like a pro:
- Overcrowding the Pan: This is a cardinal sin! It drops the oil temperature, leading to soggy, greasy chicken instead of crispy perfection. Cook in batches, folks!
- Not Preheating Your Oil Enough: Cold oil means your chicken will absorb too much fat and turn out greasy. Nobody wants that. Give it time to heat up properly.
- Skipping Seasoning the Flour: Your chicken will taste bland. Don’t be that person. **Every layer needs flavor!**
- Not Pressing the Bread Crumbs Firmly: They’ll just fall off during frying. Press them like you mean it!
Alternatives & Substitutions
Feeling adventurous? Or just missing an ingredient? No worries, we got you:
- Chicken Thighs: Absolutely! Dark meat lovers, unite. Just might need a minute or two longer per side to cook through. They’re usually juicier, FYI.
- Gluten-Free: Easy peasy! Swap out the regular flour for your favorite GF flour blend, and use gluten-free bread crumbs. Boom, GF fried chicken.
- Spice It Up: Add a pinch of cayenne pepper or chili powder to your flour mix for a little kick. Or a dash of hot sauce to the egg wash for some extra zing!
- Herbs: Dried oregano, thyme, or even a sprinkle of Italian seasoning in the bread crumbs can give it a lovely aromatic twist.
FAQ (Frequently Asked Questions)
- “Can I bake this instead of frying?” You *can*, but will it have the same glorious, deep-fried crunch? Probably not. If you must, bake at 400°F (200°C) for 15-20 minutes, flipping halfway. Still delicious, just a different vibe.
- “How do I know the chicken is cooked through?” The best way is with a meat thermometer: it should read 165°F (74°C). No thermometer? Cut into the thickest part – no pink allowed!
- “My breading keeps falling off! Help!” Did you press the crumbs firmly? And did you do the flour-egg-crumb order? It’s a crucial sequence, my friend.
- “Can I make extra and freeze it?” You bet! Let it cool completely, then freeze flat on a baking sheet before transferring to a freezer bag. Reheat in the oven for best results.
- “What should I serve this crispy goodness with?” The world is your oyster! A simple side salad, mashed potatoes, some steamed veggies, or even just between two slices of bread with your favorite sauce like a true champion.
Final Thoughts
See? I told you it was easy! Now you’ve got crispy, juicy, perfectly seasoned chicken that tastes way more effortful than it actually was. You’ve successfully navigated the perilous journey from “I’m hungry” to “OMG, I made this?!”
Go forth and conquer that hunger! You’ve officially leveled up your home-cook game. Now go impress someone—or yourself—with your new culinary skills. **You’ve earned it!**