So, you’re eyeing the fridge, trying to figure out dinner, and the thought of another boring weeknight meal makes you want to just order pizza, huh? Been there, done that, bought the T-shirt. But what if I told you there’s a dish that *looks* fancy, tastes amazing, and is surprisingly easy to whip up? Something that says, “Yeah, I cook, what of it?” without actually making you want to cry over a sink full of dishes?
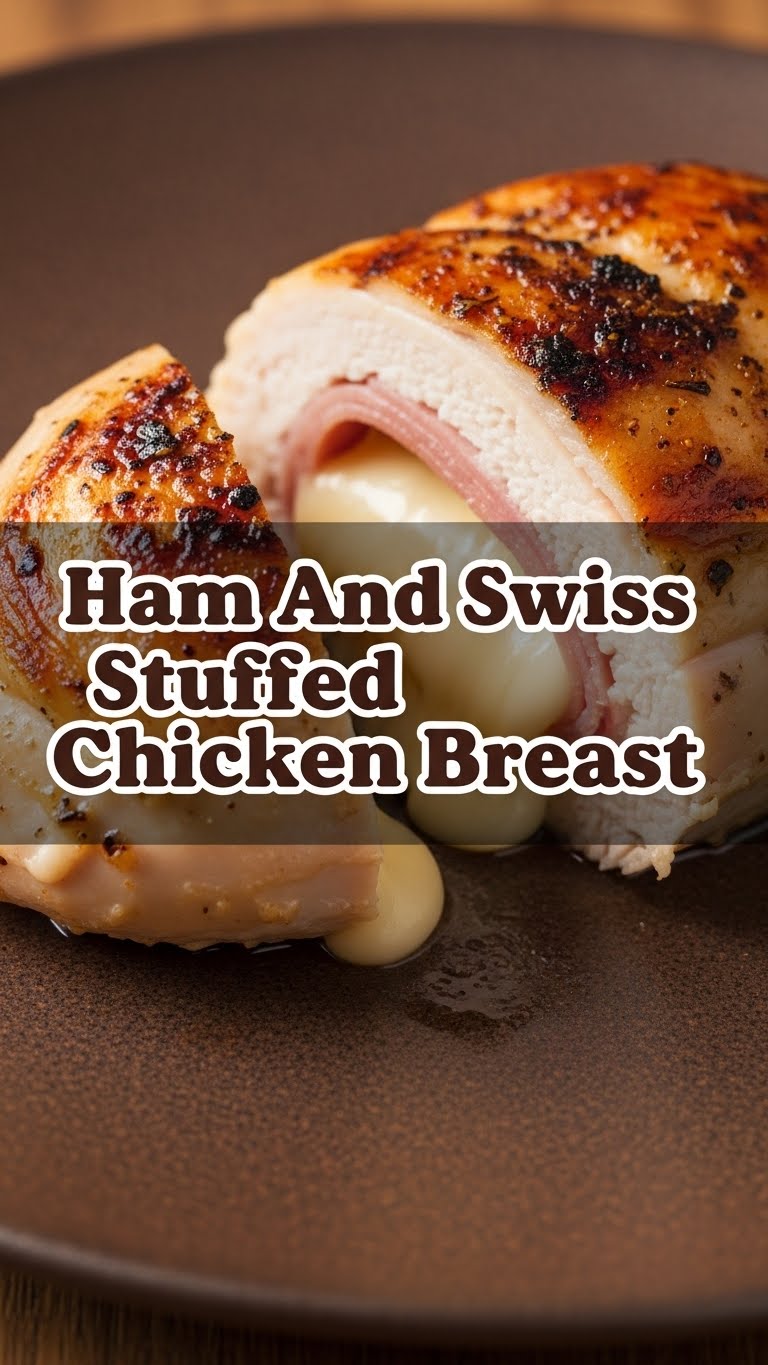
Enter the Ham and Swiss Stuffed Chicken Breast. It’s like a warm hug for your tastebuds, wrapped up in a crispy, golden package. Plus, it’s a total crowd-pleaser, whether that crowd is just you, your significant other, or the fam. Let’s get cooking, friend!
Why This Recipe is Awesome
Okay, first things first: why should you even bother with this recipe when there are a million others out there? Well, for starters, it’s pretty much **idiot-proof**. Seriously, if I can make it without setting off the smoke alarm (which is a surprisingly common occurrence in my kitchen, FYI), you totally can too.
- **It’s quick:** We’re talking minimal prep, maximum flavor. Perfect for those nights when you want something impressive but your patience is running thinner than a supermodel’s patience at a buffet.
- **It’s delicious:** Ham and Swiss cheese tucked inside tender chicken? It’s a classic combo for a reason. Add a crispy coating, and you’ve basically unlocked a cheat code for dinner happiness.
- **It looks fancy AF:** No one needs to know how easy it was. Just present it with a flourish, accept the compliments, and maybe hint that you slaved away for hours. Your secret’s safe with me.
- **Minimal cleanup:** Okay, maybe not *minimal*, but it’s not like you’re baking a seven-layer cake.
Ingredients You’ll Need
Gather your troops! Here’s what you’ll need to create this masterpiece. Don’t skimp on quality, especially the cheese – your tastebuds will thank you.
- **2 Boneless, Skinless Chicken Breasts:** Your main event! Look for relatively even-sized ones to ensure they cook at the same rate.
- **4 Slices Deli Ham:** Good quality, thinly sliced ham is key. Think of it as the cozy blanket for your cheese.
- **2 Slices Swiss Cheese:** Or a generous sprinkle of shredded Swiss. The nuttier, the better! This is where the magic happens.
- **1/2 cup All-Purpose Flour:** For dredging. Because sometimes, a little extra coat makes all the difference.
- **1 Large Egg:** Whisked. This is our sticky glue, holding all the crunchy bits on.
- **1 cup Panko Breadcrumbs:** Or regular breadcrumbs, but Panko gives you that extra satisfying crunch. Don’t skip this if you love texture!
- **1/2 tsp Garlic Powder:** Because garlic makes everything better. It’s science.
- **1/2 tsp Paprika:** Adds a lovely color and a little something-something to the coating.
- **Salt and Black Pepper to taste:** Duh. Season those birds!
- **2-3 tbsp Olive Oil (or your preferred cooking oil):** For pan-frying.
- **Optional: Fresh Parsley, chopped:** For a fancy garnish, if you’re feeling extra.
Step-by-Step Instructions
Alright, apron on, “pump-up” playlist ready? Let’s do this!
- **Preheat Your Oven & Prep Your Station:** First things first, get that oven going to **400°F (200°C)**. Line a baking sheet with parchment paper for easy cleanup later. Now, set up your dredging station: three shallow dishes. One with flour, garlic powder, paprika, salt, and pepper mixed; one with your whisked egg; and one with the Panko breadcrumbs.
- **Butterfly or Pound Your Chicken:** Take each chicken breast and, using a sharp knife, carefully slice it horizontally almost all the way through, creating a “butterfly” shape. Don’t cut all the way! Open it up like a book. Alternatively, you can place chicken breasts between two pieces of plastic wrap and pound them to about 1/2 inch thickness. **Aim for even thickness for consistent cooking!**
- **Stuff Those Breasts:** Lay one slice of ham on one side of the butterflied chicken. Top it with half a slice of Swiss cheese (or a sprinkle of shredded). If you’re using two slices of ham, layer them. Then, add the rest of the cheese. Fold the other half of the chicken over the stuffing, or roll it up tightly from one end if you pounded it flat.
- **Secure Your Rolls:** This is crucial! Use a couple of toothpicks to secure the edges and prevent the delicious filling from escaping during cooking. We want all that gooey cheese to stay put!
- **Dredge Like a Pro:** Carefully coat each stuffed chicken breast in the seasoned flour, shaking off any excess. Then, dip it into the whisked egg, letting any extra drip off. Finally, roll it generously in the Panko breadcrumbs, pressing gently to make sure they stick. **A good coating equals a crispy exterior!**
- **Get Sizzling:** Heat the olive oil in a large oven-safe skillet over medium-high heat. Once hot, carefully place the breaded chicken breasts in the skillet. Sear for **2-3 minutes per side**, until golden brown and crispy. This step creates that amazing crust!
- **Into the Oven They Go:** Transfer the skillet (or carefully move the chicken to your prepared baking sheet) into the preheated oven. Bake for **15-20 minutes**, or until the internal temperature of the chicken reaches **165°F (74°C)**. A meat thermometer is your best friend here!
- **Rest & Serve:** Once cooked, remove the chicken from the oven and let it rest for about 5 minutes. This helps the juices redistribute, keeping your chicken moist and tender. Don’t forget to **remove those toothpicks** before serving! Garnish with fresh parsley if you’re feeling fancy.
Common Mistakes to Avoid
Listen, we’ve all been there. Learning from mistakes is part of the fun (usually). Here are a few blunders to steer clear of:
- **Overstuffing:** It’s tempting to cram in all the cheese, but if you overstuff, your beautiful creation will explode in the oven like a cheesy volcano. Less is more here, friend.
- **Not Securing Properly:** Those toothpicks aren’t just for show. If you don’t secure the edges, the filling *will* ooze out. And while melty cheese is great, you want it *inside* the chicken, not all over your baking sheet.
- **Skipping the Sear:** Think you can just bake it? You *can*, but you’ll miss out on that glorious golden-brown, crispy crust that takes this dish from “good” to “**OMG**.” Don’t skip the sear!
- **Overcooking the Chicken:** This is the cardinal sin of chicken cookery. Dry chicken is sad chicken. Use a meat thermometer to ensure it hits 165°F (74°C) and then get it out of there!
- **Forgetting to Season:** Plain flour and chicken are… bland. Don’t be afraid to season your flour mixture and even give the chicken a little sprinkle of salt and pepper before breading.
Alternatives & Substitutions
Feeling adventurous? Or just missing an ingredient? No worries, we’ve got options!
- **Cheese Swap:** Not a Swiss fan? You could totally use provolone, mozzarella, or even a sharp cheddar. They all melt beautifully!
- **Ham Replacement:** If ham isn’t your jam, try thinly sliced prosciutto, turkey, or even cooked bacon bits for a different flavor profile.
- **Breading Variations:** Want to go low-carb? Skip the flour and breadcrumbs and simply pan-fry or bake the stuffed chicken. Or, crush up some pork rinds for a keto-friendly crust! You could also add herbs like dried thyme or oregano to the breadcrumbs for extra pizzazz.
- **Saucy Upgrade:** Drizzle with a simple pan sauce made from chicken broth, a splash of white wine, and a knob of butter after it’s done baking. Fancy!
- **Air Fryer Method:** If you have an air fryer, you can totally use it! Air fry at 375°F (190°C) for 15-20 minutes, flipping halfway, until golden and cooked through.
FAQ (Frequently Asked Questions)
Got questions? I’ve got (mostly sarcastic) answers!
- **Can I prepare this ahead of time?** Absolutely! You can stuff and bread the chicken a few hours in advance, cover it, and refrigerate. Just let it sit at room temp for 15-20 minutes before cooking.
- **What if I don’t have Panko breadcrumbs?** Regular breadcrumbs work just fine! Panko just gives you a little extra crunch. No biggie.
- **Can I just bake it without pan-frying?** Technically, yes. But why would you want to miss out on that glorious golden crisp? IMO, the sear is non-negotiable for max deliciousness.
- **How do I know the chicken is cooked through?** This is where your trusty meat thermometer comes in. Insert it into the thickest part of the chicken (avoiding the stuffing if possible). It’s done when it hits **165°F (74°C)**. No thermometer? Cut into one and check for clear juices and no pink!
- **What can I serve with this?** So many options! A simple green salad, roasted asparagus, mashed potatoes, or even some wild rice would be perfect. Keep it light so the chicken can shine!
- **My cheese keeps leaking out! What gives?** You either overstuffed it (see “Common Mistakes”) or didn’t secure it tightly enough with toothpicks. Don’t be shy with those little wooden heroes!
Final Thoughts
And there you have it! A surprisingly simple, yet incredibly satisfying, Ham and Swiss Stuffed Chicken Breast that’s guaranteed to impress. It’s the kind of dish that makes you feel like a culinary rockstar without requiring a culinary degree (or even breaking a sweat).
Now go forth, my friend, and conquer your kitchen! Whisk, stuff, sear, bake, and then enjoy the fruits of your not-so-laborious labor. You’ve earned it!