So you’ve decided to tackle the mighty chicken breast bone, huh? Bold move, friend, bold move. You’re probably picturing yourself as some kind of kitchen samurai, expertly wielding a blade and liberating delicious meat from its boney prison. Or maybe you just got a great deal on bone-in chicken and now you’re wondering what you’ve gotten yourself into. Either way, you’re in the right place! Let’s get this chicken deboned without losing a finger or your sanity. It’s easier than trying to explain cryptocurrency to your grandma, I promise.
Why This Skill is Awesome
Okay, so “recipe” might be a strong word since we’re mostly just performing surgery on a chicken, but trust me, mastering the art of deboning a chicken breast is a total game-changer. Why? Let me count the ways:
- Money Saver: Bone-in chicken is often cheaper. You’re basically getting a discount for doing a little DIY, you clever human!
- Versatility Galore: Once that bone is out, your chicken breast becomes a blank canvas. Pound it flat for schnitzel, slice it for stir-fry, stuff it with cheese, or just grill it perfectly even. The world is your oyster… or, well, your chicken.
- Even Cooking: A boneless, skinless breast cooks way more evenly than its bone-in counterpart. No more raw bits near the bone while the rest is dry!
- Bragging Rights: You deboned a chicken. That’s kinda cool, right? Tell your friends. Tell your pets. They’ll be impressed (or just want treats).
- Stock Superpower: Those bones you removed? Don’t trash ’em! They’re a goldmine for homemade chicken stock. Waste not, want not, my frugal friend.
Tools You’ll Need
Since we’re doing a technique, not cooking a dish (yet!), our “ingredients” are really just our trusty sidekicks. Get ready, chef!
- Bone-In, Skin-On (or Off!) Chicken Breast: The star of our show. The bigger, the easier, IMO.
- A REALLY Sharp Knife: This is non-negotiable, folks. A dull knife is dangerous and will make you want to rage-quit. Think boning knife or a very sharp chef’s knife.
- Sturdy Cutting Board: One that won’t slide around like a figure skater. Maybe put a damp paper towel underneath for extra grip.
- Paper Towels: For patting the chicken dry and for wiping down your board/hands (see safety above!).
Step-by-Step Instructions
Alright, let’s get down to business. Remember, slow and steady wins the race (and keeps all your fingers intact).
-
Prep Your Chicken: First things first, grab that chicken breast and give it a good pat-down with paper towels. A dry chicken is a grippier chicken, making it safer to handle.
-
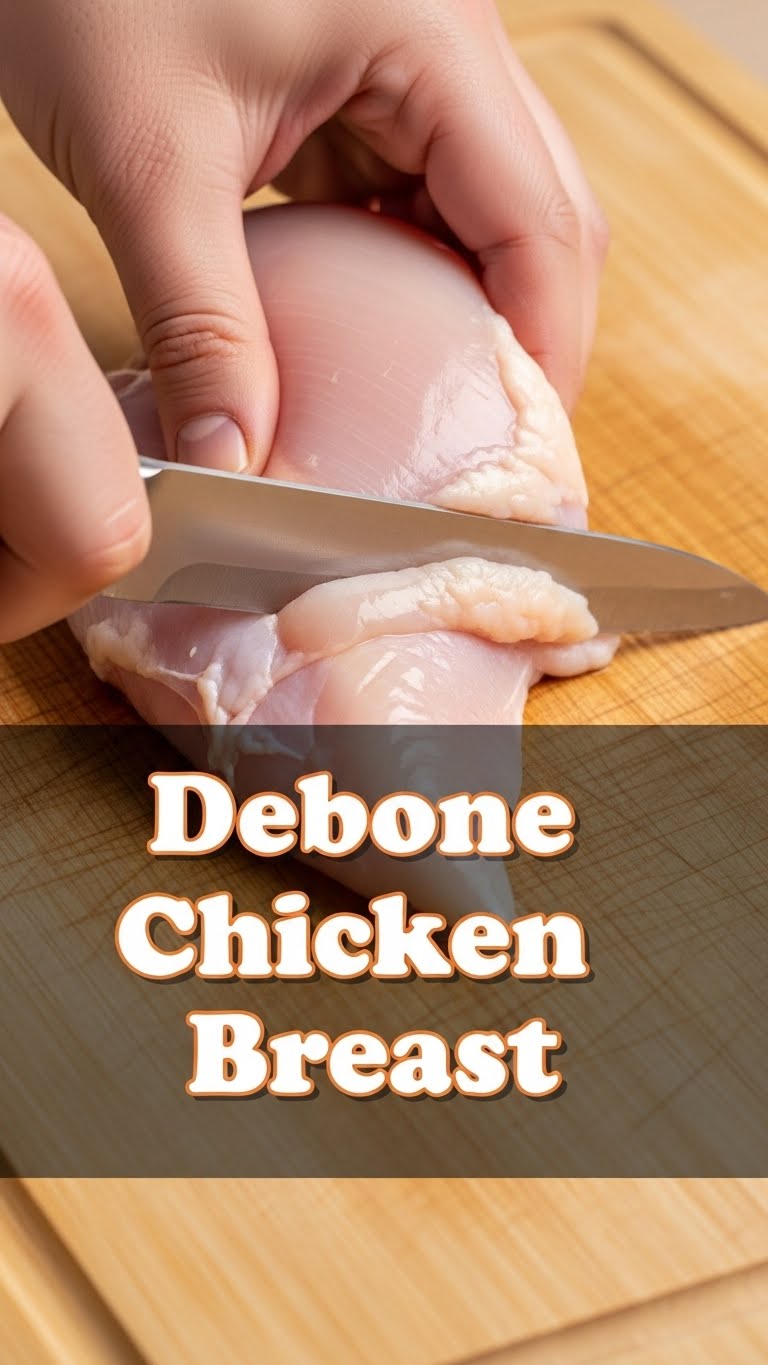
Find the Bone Line: Lay the chicken breast flat on your cutting board, skin-side up (if it has skin). Flip it over to the meat side. You’ll see a prominent, long, white bone running down the middle. That’s your target, soldier.
-
Make the First Incision: Take your sharp knife and make a shallow cut right down the middle, alongside one side of that bone. Go from one end of the breast to the other. Don’t go too deep; you’re just finding your path.
-
Work Around the Bone: Now, this is where the magic happens. Angle your knife slightly and start making short, precise cuts, following the curve of the bone. Keep the blade as close to the bone as possible to maximize your meat yield. Use the tip of your knife to scrape and separate the meat from the bone.
-
Peel and Pull: As you cut, gently pull the meat away from the bone with your free hand. You’ll feel the meat detaching. Keep scraping until one side of the breast is completely free from the main bone.
-
Flip and Repeat: Now, flip the breast over (or just reposition) and repeat the process on the other side of the bone. Follow the bone’s curve, keeping your knife tight against it, until both halves of the breast are separated from the main bone. You’ll likely encounter a bit of cartilage at the top; just cut around it.
-
Remove Cartilage/Ribs: Once the main bone is out, you might find some small rib bones or bits of cartilage clinging to the meat. Carefully trim these away. FYI, the little “tenderloin” piece often comes off easily—don’t lose it!
-
Trim and Tidy: Now that your breast is boneless, you can remove the skin (if you haven’t already and don’t want it) and trim any excess fat or gristle. Voila! You have two beautiful boneless chicken breast halves.
Common Mistakes to Avoid
Nobody’s perfect, especially when handling sharp objects and raw chicken. Here are a few rookie errors to steer clear of:
- The Dull Knife Debacle: Seriously, don’t even try with a dull knife. You’ll slip, get frustrated, and potentially hurt yourself. Plus, you’ll butcher the chicken, making it look like a crime scene.
- Leaving Half the Meat on the Bone: We’re trying to save money here, not feed the trash can. Take your time and scrape that knife *right* along the bone. Every gram counts!
- Rushing Like a Maniac: This isn’t a race. Haste makes waste, and also bloody fingers. Take your time, focus on your cuts, and enjoy the process (or at least pretend to).
- Cutting Towards Yourself: This is just basic knife safety, people! Always cut away from your body. Your fingers will thank you.
- Forgetting to Clean Up: Raw chicken means potential bacteria. Wash your hands thoroughly, clean your cutting board, and sanitize your counter. Salmonella is NOT a secret ingredient you want to add.
Alternatives & Substitutions
Since we’re talking technique here, “alternatives” are a bit different. But hey, let’s get creative!
- Too Lazy for This? No judgment here! Just buy boneless chicken breasts. Problem solved. Or, if you have a friendly butcher, ask them to debone it for you. They’re pros, and it’s usually free!
- What to Do With Those Glorious Bones? Seriously, don’t throw them out! Collect them in a freezer bag. Once you have a good amount, make chicken stock! Throw them in a pot with some veggie scraps (onions, carrots, celery), cover with water, simmer for a few hours, strain, and boom—liquid gold for soups, sauces, or just sipping.
- What About the Skin? If your chicken breast came with skin and you peeled it off, you can crisp it up! Bake or fry until crunchy, season, and enjoy as a delightful, albeit guilty, snack. Or keep it on for roasting; crispy chicken skin is life.
FAQ (Frequently Asked Questions)
Got questions? I’ve got (casual and hopefully witty) answers!
- Is it really worth the effort?
Absolutely! It saves you money, gives you more control over your cut of meat, and frankly, makes you feel like a kitchen boss. Plus, homemade stock!
- What kind of knife is best for this?
A boning knife is ideal because its thin, flexible blade navigates around bones beautifully. But a very sharp chef’s knife or utility knife will also do the trick. Just make sure it’s SHARP!
- What if I nick the bone and get little bone shards in the meat?
Oops! It happens. Just carefully inspect your deboned meat for any small bone fragments before cooking. You don’t want a surprise crunch when you’re eating!
- Can I debone other parts of the chicken, like thighs?
You bet! The technique is similar, just adjusted for the different bone structure. Thighs are actually often easier for beginners because the bone is more accessible. Practice makes perfect, right?
- My chicken breast isn’t perfectly flat after deboning. What gives?
Totally normal! You can place the deboned breast between two pieces of plastic wrap and gently pound it with a mallet or rolling pin to achieve an even thickness. This is especially good if you’re making cutlets or stuffing it.
- What do I do with the removed skin and fat?
If you don’t want to make crispy skin (which, why wouldn’t you?), you can discard it. The fat can also be trimmed and discarded, or rendered down for schmaltz (chicken fat), which is great for cooking! Zero waste, baby!
Final Thoughts
So there you have it! You just conquered the chicken breast bone. You’re officially a level up in the kitchen, and your future meals are going to be all the better for it. Pat yourself on the back, maybe do a little victory dance, and then go wash those hands! Now go impress someone—or yourself—with your new culinary skills. You’ve earned it!