So you’re craving something tasty but too lazy to spend forever in the kitchen, huh? Same. We’ve all been there: staring into the fridge, a lonely chicken breast staring back, wondering if it’s possible to make something delicious without summoning your inner Michelin-star chef (or, you know, just ordering takeout). Good news, buttercup! Sauteing chicken breast is your new superpower. It’s fast, it’s fabulous, and honestly, if I can do it without setting off the smoke detector, so can you.
Why This Recipe is Awesome
Let’s be real, this isn’t some groundbreaking culinary revelation. But it IS the ultimate weeknight warrior. Why? Because it’s:
- Stupid-easy: Seriously, if you can turn on a stove, you’re halfway there.
- Lightning-fast: We’re talking 15-20 minutes, tops, from raw chicken to “yum, I made this!”
- Ridiculously versatile: This is your blank canvas. Top it with sauce, chop it into a salad, stuff it into a pita. The chicken world is your oyster (or, you know, your chicken).
- Fool-proof (mostly): Even if you’re usually more of a “burner of water” than a “master of the pan,” you’ll nail this. Promise.
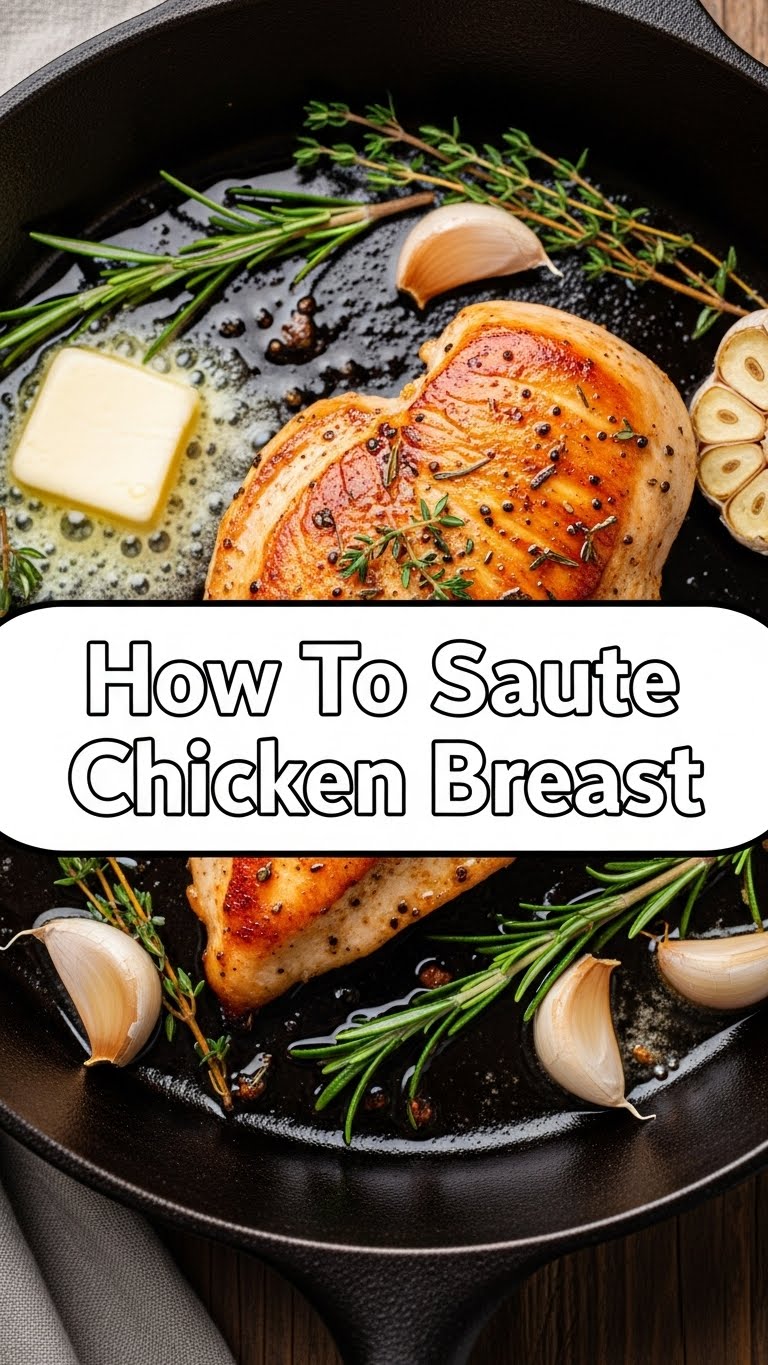
Ingredients You’ll Need
Keep it simple, superstar. You don’t need a pantry full of exotic spices for this one. Just the good stuff.
- Chicken Breasts: 1-2 boneless, skinless, because we’re going for speed here. Go for good quality if you can; happy chickens make happy eats.
- Olive Oil (or Avocado Oil): A couple of tablespoons. For searing and getting that lovely golden crust.
- Butter: 1-2 tablespoons. Because butter makes everything better. It’s science. And deliciousness.
- Salt & Freshly Ground Black Pepper: Don’t be shy! These are your essential flavor buddies.
- Optional Flavor Boosters: A pinch of garlic powder, onion powder, or smoked paprika if you’re feeling fancy (or just want more flavor, IMO).
Step-by-Step Instructions
-
Prep the Chicken Like a Pro: Grab your chicken breasts. If they’re super thick (like over an inch), slice them horizontally to make two thinner cutlets, or pound them gently until they’re about 1/2 to 3/4 inch thick. Thinner chicken cooks faster and more evenly. Pat ’em dry with a paper towel. This is super important for getting a good sear, not a sad steam!
-
Season Generously: Now’s the time to show that chicken some love. Sprinkle both sides with a generous amount of salt and pepper. Add any optional spices you’re using. Don’t be afraid to go a little heavy; bland chicken is a culinary crime.
-
Heat That Pan: Place a large skillet (cast iron or stainless steel works best for searing) over medium-high heat. Let it get nice and hot for about 2-3 minutes. Add 1 tablespoon of olive oil. You want the oil to shimmer, almost smoking, but not quite. That’s your cue.
-
Sear, Baby, Sear!: Carefully place the seasoned chicken breasts into the hot pan. Don’t overcrowd the pan; if you’re cooking more than two, do them in batches. Let them cook undisturbed for 4-6 minutes, or until they have a beautiful golden-brown crust.
-
Flip and Finish: Flip the chicken breasts over. Now, add the butter to the pan. Let it melt and sizzle. Continue cooking for another 4-6 minutes on the second side, spooning some of that lovely melted butter over the chicken as it cooks. This adds flavor and keeps it moist!
-
Check for Doneness (No Guessing!): The best way to know if your chicken is cooked through is with an instant-read thermometer. It should read 165°F (74°C) in the thickest part. If you don’t have one, cut into the thickest part—the juices should run clear, and there should be no pink.
-
Rest, Don’t Stress: Remove the chicken from the pan and place it on a cutting board. Let it rest for at least 5 minutes before slicing. This is crucial! It allows the juices to redistribute throughout the chicken, keeping it tender and juicy. Don’t skip this step, for the love of all that is delicious!
Common Mistakes to Avoid
Even the pros make mistakes, but you don’t have to make these!
- Not Patting the Chicken Dry: This is probably the number one culprit for sad, gray chicken instead of beautifully seared goodness. Water creates steam, and steam prevents browning. Pat. It. Dry.
- Crowding the Pan: I know you’re in a hurry, but resist the urge to cram all the chicken in at once. An overcrowded pan lowers the temperature, leading to steaming instead of searing. Cook in batches if needed!
- Not Heating the Pan Enough: A cold or lukewarm pan means your chicken will stick and won’t get that gorgeous crust. Wait for the oil to shimmer. Patience, grasshopper.
- Overcooking: This is how you get dry, rubbery chicken. Nobody wants that. Use a thermometer if you’re unsure. As soon as it hits 165°F, it’s done!
- Skipping the Rest: Seriously, don’t do it. Cutting into chicken immediately after cooking is like letting all the hard work (and juicy goodness) escape onto your cutting board. Give it a break!
Alternatives & Substitutions
Feeling a little adventurous? Or just out of something? No worries, we got options!
- Different Fats: No olive oil? Avocado oil, grapeseed oil, or even a neutral vegetable oil will work just fine. Not a butter fan? Ghee or even a little bacon fat (hello, extra flavor!) can be used.
- Spice It Up: Go wild! Lemon pepper, Italian seasoning, taco seasoning, curry powder, or a simple sprinkle of dried herbs like oregano or thyme. The world is your spice rack. Just make sure to taste it before you add a whole jar!
- Marinades: For extra flavor and tenderness, you can marinate the chicken for at least 30 minutes (or up to a few hours) before sauteing. Think lemon-herb, a quick teriyaki, or a zesty lime marinade. Just remember to pat it dry *after* marinating!
- Veggie Boost: Want a one-pan meal? After removing the cooked chicken, toss some sliced bell peppers, onions, or zucchini into the same pan with a little more oil. Cook until tender-crisp, then add the sliced chicken back in for a quick stir. Easy peasy!
FAQ (Frequently Asked Questions)
Got questions? I’ve probably already answered them in my head while cooking, so let’s get ’em out!
- How do I know if my chicken is truly cooked without a thermometer? Well, you can cut into the thickest part. If the juices run clear and there’s no pink, you’re usually good. But honestly, for food safety and preventing dry chicken, a thermometer is your best friend. They’re cheap, FYI!
- Can I use frozen chicken breasts? You can, but you *must* thaw them completely first. Cooking from frozen will lead to uneven cooking and potentially rubbery chicken. Don’t be a hero; plan ahead!
- What kind of pan is best for sauteing? A cast-iron skillet or a good quality stainless steel pan. They retain heat really well and give you the best sear. Non-stick pans work, but you won’t get quite the same golden crust.
- Should I use skin-on or skinless chicken breasts? Skinless is faster and usually what people mean when they say “chicken breast.” Skin-on gives you a crispy, delicious skin (if cooked properly), but takes a bit longer and is higher in fat. Your call!
- Why is my chicken tough? Chances are, you overcooked it, friend. Or you didn’t let it rest. Either way, next time, pull it off the heat right at 165°F and give it that crucial resting period.
- Can I skip the butter? Technically, yes. You can just use oil. But why hurt your soul (and your taste buds) like that? The butter adds incredible flavor and helps with browning. Live a little!
Final Thoughts
See? That wasn’t so scary, was it? You just whipped up a delicious, healthy, and versatile meal in less time than it takes to decide what to binge-watch. Now go impress someone—or yourself—with your new culinary skills. You’ve earned it! Grab a fork, dig in, and bask in the glory of your perfectly sauteed chicken. You’re a kitchen rockstar, and don’t let anyone tell you otherwise!