So, you’ve got a recipe that calls for boneless chicken breast, and you’re staring at those bone-in beauties in your fridge, wondering if it’s worth the hassle? Or maybe you just prefer your chicken without the surprise chew of a rogue bone? Whatever your reason, getting rid of that pesky bone is easier than you think. No more overpaying for boneless at the store, my friend. Let’s get you slicing and dicing like a pro!
Why Deboning Chicken Breast is Awesome
Because who needs extra steps or surprise bones when you’re aiming for culinary greatness (or just a quick Tuesday night dinner)? Deboning chicken at home is your secret weapon for a few reasons:
- Budget-Friendly: Bone-in chicken is almost always cheaper. You’re basically getting paid to do this!
- Control Freak Approved: You decide how much fat to trim, giving you healthier, leaner cuts. Take that, factory-trimmed!
- Versatility Galore: Once boneless, your chicken breast is ready for anything – stuffing, stir-frying, grilling, breading. The world is your oyster… or, well, your chicken.
- Seriously Satisfying: There’s a certain primal joy in surgically removing a bone. You’ll feel like a culinary ninja, trust me. It’s pretty idiot-proof, honestly, even I didn’t mess it up on my first try (mostly).
Ingredients You’ll Need
Okay, “ingredients” might be a strong word for this, since it’s more about tools and technique, but let’s humor ourselves:
- Bone-In, Skin-On or Skinless Chicken Breasts: As many as your culinary ambitions desire.
- A Very Sharp Knife: This is non-negotiable. Seriously, a dull knife is your enemy, an invitation to slippage, and a harbinger of frustration. Think chef’s knife or a boning knife if you’re feeling fancy.
- A Sturdy Cutting Board: Preferably one that doesn’t try to escape your counter every time you apply pressure.
- Paper Towels (Optional, but Smart): For gripping the chicken and keeping things tidy.
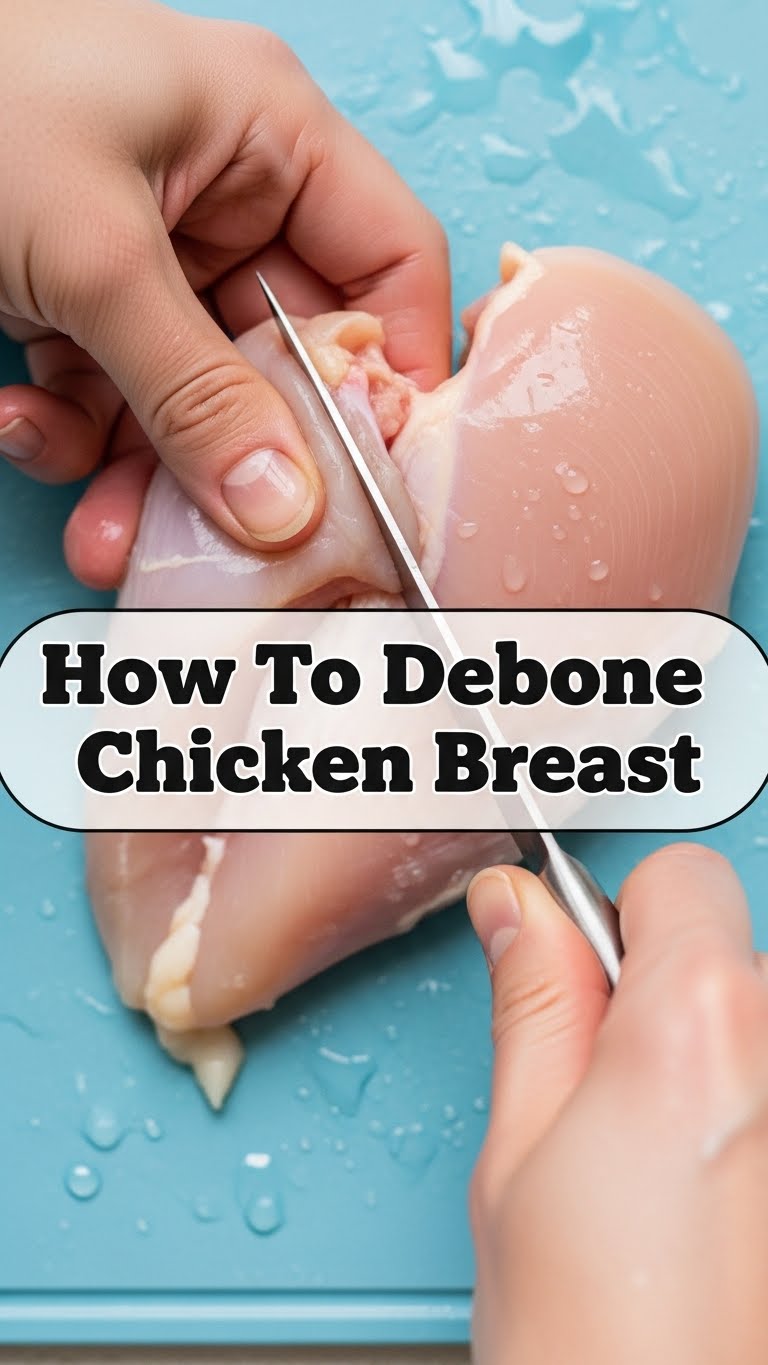
Step-by-Step Instructions
Alright, apron on, brave chef! Let’s get to the good stuff.
-
Prep Your Battlefield: Place your chicken breast on your cutting board. If it has skin, you can remove it now or after deboning. Personally, I find it easier to remove after the bone is out, but you do you. **Pat the chicken dry with paper towels.** This gives you a much better grip and prevents slippage.
-
Find the Ridge: Feel for the breastbone running right down the center of the breast. It’s usually a pretty prominent ridge. This is your guiding star.
-
Slice Along One Side: Take your sharp knife and make a shallow incision right along one side of the breastbone. Keep the blade **very close to the bone**, angling it slightly as you go. You’re trying to scrape the meat *off* the bone, not through it.
-
Work Your Way Down: Continue slicing, keeping your knife angled and pressed against the bone. Use short, controlled strokes. You’ll feel the meat separating from the bone. Once you hit the rib cage area (the flatter, smaller bones), you’ll need to adjust your angle slightly.
-
Free the First Fillet: Keep going until that first half of the breast is completely separated from the bone. It should look like a glorious, boneless fillet. Set it aside.
-
Flip and Repeat: Turn the chicken breast over. Now, tackle the other side of the breastbone, following the same technique. Slice along the bone, angling your knife, and carefully separating the meat until the second fillet is free.
-
The Wishbone Whammy (Optional): Sometimes a small, V-shaped bone (the wishbone) might still be hanging around at the top. You can either feel for it and cut around it, or gently pull it out with your fingers once most of the meat is off. It’s usually pretty loose at this point. **FYI:** If you’re struggling, just trim around it carefully.
-
Trim and Tidy: Now that you have two beautiful boneless fillets, inspect them. Trim off any excess fat, gristle, or bits of bone you might have missed. Remove the skin if you haven’t already. You’re done! **Pat yourself on the back.**
Common Mistakes to Avoid
- Dull Knife Disaster: I said it once, I’ll say it a thousand times: **a dull knife is dangerous and makes this task a nightmare.** You’ll hack at the chicken, rip the meat, and possibly yourself. Get it sharpened!
- Cutting Through the Bone: If you find yourself sawing through bone, you’re not angling your knife correctly. You want to *scrape* the meat *off* the bone, not cut *through* it. Rookie mistake, but easily corrected.
- Leaving Too Much Meat on the Bone: Don’t be shy! Get as close to that bone as possible to maximize your yield. Your future self (and your wallet) will thank you.
- Rushing It: This isn’t a race. Take your time, especially the first few times. Precision over speed, always.
Alternatives & Substitutions
Okay, “substitutions” isn’t really a thing when you’re deboning chicken. You either do it, or you don’t. But here are some thoughts:
- Pre-Deboned Chicken: The ultimate “alternative” is, of course, buying boneless chicken. But where’s the fun (and savings) in that, huh?
- Using a Different Knife: While a boning knife is the pro choice, a good, sharp chef’s knife or even a paring knife for smaller areas can totally work. Just make sure it’s sharp, IMO.
- Chicken Thighs: The same technique pretty much applies to chicken thighs, though their bones are a bit different. Once you master the breast, give the thighs a go!
FAQ (Frequently Asked Questions)
Got questions? I’ve got answers (mostly humorous ones).
Q: Is it really worth the effort? I mean, I can just buy boneless.
A: Well, sure, you *can* buy boneless. But think of the money you save! And the satisfaction! And the bragging rights! Plus, it takes like 2 minutes once you get the hang of it. What’s 2 minutes when culinary ninja status is on the line?
Q: What if I accidentally cut myself?
A: First, make sure your knife is sharp! Seriously. Second, always cut *away* from your body. And if a little nick happens (it happens to the best of us), clean it, bandage it, and remember that battle scars make you look more experienced.
Q: Can I debone frozen chicken?
A: You *could*, but why would you want to? You’d need a chainsaw. Thaw that bird completely, friend. Don’t make things harder than they need to be.
Q: What do I do with the bones? Waste not, want not!
A: Excellent question! Don’t toss them! Those bones are liquid gold for making homemade chicken stock. Freeze ’em up and use them next time you’re making soup. It’s a game-changer, trust me.
Q: My chicken breast looks a bit ragged after deboning. Did I do it wrong?
A: Nah, probably not! Especially the first few times, it won’t be perfectly pristine. Just trim off any overly ragged bits. Once you slice, dice, or cook it, no one will ever know it wasn’t a perfect, factory-cut fillet. It’s all about the flavor, right?
Q: Is it okay to leave a tiny bit of meat on the bone?
A: Absolutely! Don’t stress over perfection. A little meat on the bone just means more flavor for your stock if you’re making it. Consider it a bonus!
Final Thoughts
And there you have it! You’ve officially conquered the chicken breast bone. See? Not so scary, right? Now you’re equipped with a new skill that’ll save you money and open up a world of culinary possibilities. Go forth, create delicious meals, and impress everyone with your newfound deboning prowess. Or just impress yourself, that’s cool too. You’ve earned it!