So, You’re Craving Something Fancy But Too Lazy To Spend Forever In The Kitchen, Huh? Same.
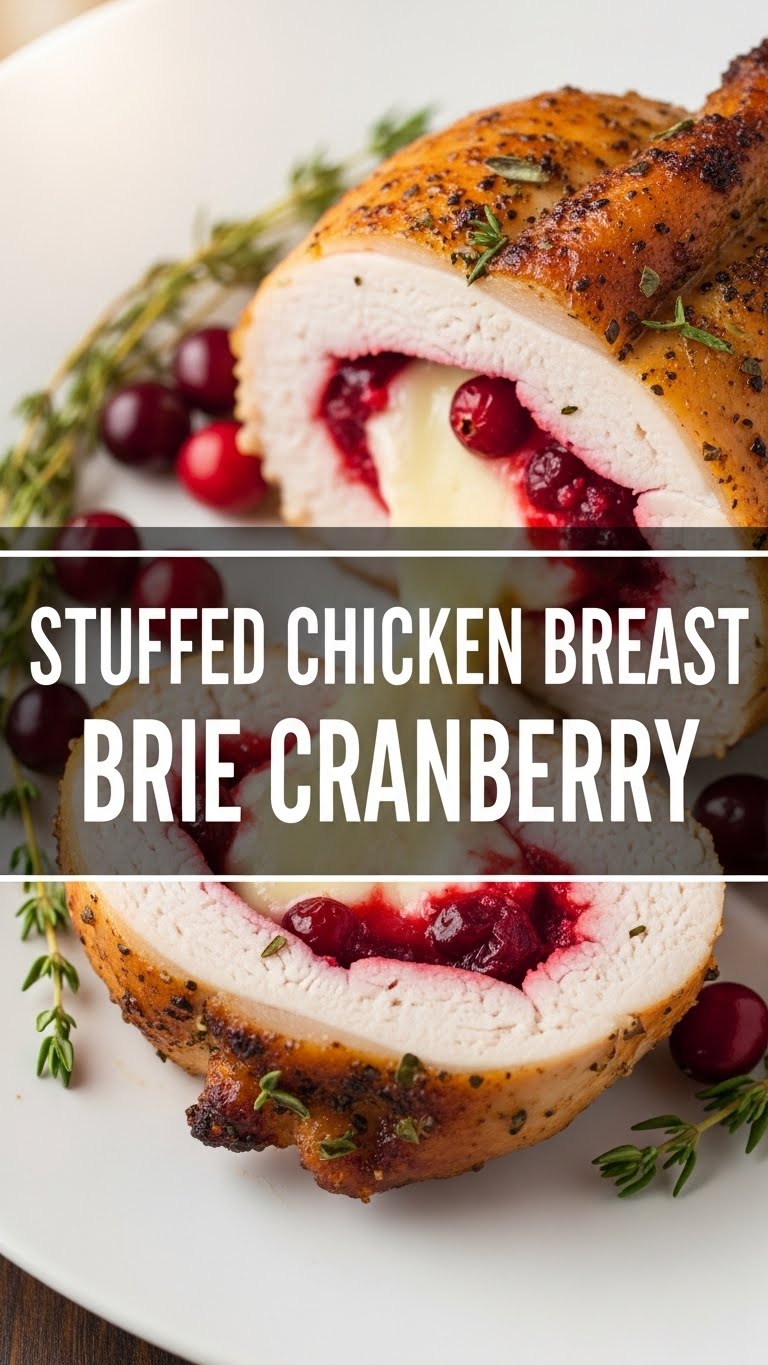
Listen up, buttercup. We’ve all been there: you want to whip up something that screams “I’m a culinary genius!” but your actual energy levels are whispering “Can we just order pizza?” Fear not, my friend. This Stuffed Chicken Breast with Brie and Cranberry recipe is your new secret weapon. It’s ridiculously easy, looks super impressive, and tastes like a flavor party in your mouth. Trust me on this one; your tastebuds (and your ego) will thank you.
Why This Recipe Is Awesome
Okay, let’s be real. This isn’t just “good,” it’s “holy moly, did you seriously make this?!” good. It’s the kind of dish that makes guests think you secretly went to culinary school, when in reality, you just followed a few simple steps. It’s pretty much **idiot-proof**, which is saying something because, well, I’ve had my moments in the kitchen. The creamy, melty brie, the sweet-tart cranberries, and the tender chicken are a match made in heaven. Plus, it comes together faster than you can say “is it wine o’clock yet?”
Ingredients You’ll Need
Gather your troops, folks! Here’s what we’re wrangling for this deliciousness:
- Boneless, Skinless Chicken Breasts: 2 large or 4 small. The star of our show, obvs.
- Brie Cheese: About 4-6 ounces. Get a nice wedge or a small wheel. We’re going for maximum meltiness, so don’t be shy!
- Dried Cranberries: Half a cup. These little ruby gems add that perfect sweet-tart pop.
- Fresh Thyme: A few sprigs, leaves picked. Makes it smell all fancy AF. If you only have dried, about a teaspoon works.
- Garlic Powder: Half a teaspoon. Because sometimes, mincing fresh garlic is just too much effort. No judgment.
- Salt & Freshly Ground Black Pepper: To taste. Duh.
- Olive Oil: A couple of tablespoons for searing. Your trusty kitchen sidekick.
- Optional: A splash of white wine or chicken broth for a quick pan sauce at the end. Because why not?
Step-by-Step Instructions
Get ready to feel like a kitchen wizard!
- Prep Your Chicken: Lay your chicken breasts flat. If they’re super thick, carefully slice them horizontally almost all the way through, creating a “pocket” (this is called butterflying). Or, you can just pound them thin between two pieces of plastic wrap. Aim for about half an inch thick. This ensures even cooking and plenty of stuffing room.
- Season It Up: Sprinkle both sides of your chicken with salt, pepper, and garlic powder. Don’t be shy, seasoning is key to flavor!
- Stuff It Silly: Cut your brie into slices or small cubes. On one half of each chicken breast, layer the brie, then sprinkle generously with dried cranberries and fresh thyme leaves. Don’t overstuff, or it’ll be a messy escape artist in the oven.
- Fold & Secure: Fold the other half of the chicken over the filling. Press the edges to seal. You might need to secure it with a couple of toothpicks. Consider these your chicken’s tiny little seatbelts.
- Sear for Glory: Heat olive oil in an oven-safe skillet (cast iron works great!) over medium-high heat. Once hot, carefully place the stuffed chicken breasts in the pan. Sear for 3-4 minutes per side until beautifully golden brown. This creates a fantastic crust!
- Bake It Off: Transfer the skillet to a preheated oven at 400°F (200°C). Bake for 15-20 minutes, or until the chicken is cooked through and the cheese is gloriously gooey. **For perfectly juicy chicken, use a meat thermometer – it should read 165°F (74°C) in the thickest part.**
- Rest, Please: Remove the chicken from the oven and let it rest on a cutting board for 5-10 minutes. This is **super important**; it allows the juices to redistribute, keeping your chicken moist and tender. Remove any toothpicks before serving!
- Serve & Devour: Slice and serve immediately. If you want a quick pan sauce, deglaze the skillet with a splash of white wine or chicken broth while the chicken rests, scraping up any delicious browned bits.
Common Mistakes to Avoid
Nobody’s perfect, but we can try to avoid these rookie errors!
- Overstuffing: Your chicken isn’t a bottomless pit, folks! Too much filling means a cheesy, cranberry explosion all over your pan instead of *inside* your chicken.
- Not Seasoning Enough: Bland chicken is a sad chicken. Don’t skip the salt, pepper, and garlic powder. They are the unsung heroes.
- Skipping the Sear: You *could* just bake it, but why deny yourself that beautiful golden crust and extra layer of flavor? **Don’t skip the sear, it makes a huge difference!**
- Overcooking: Dry chicken is the enemy. It’s why we bake it after searing and why a meat thermometer is your best friend. Seriously, get one.
- Ignoring the Rest Time: Impatience is a virtue sometimes, but not here. Cutting into hot chicken immediately means all those delicious juices will run out, leaving you with dry poultry. Let it chill!
Alternatives & Substitutions
Feeling adventurous? Or just missing an ingredient? No worries, we can totally improvise!
- Cheese Swap: No brie? Camembert works beautifully, or even a good quality herbed cream cheese for a different vibe. Heck, if you’re feeling wild, a little goat cheese could be interesting, too!
- Fruit Fusion: Swap dried cranberries for dried apricots, chopped dates, or even a few sun-dried tomatoes (if you want a more savory-sweet combo).
- Herb It Up: Instead of thyme, try fresh rosemary or sage for a more earthy flavor. Parsley works in a pinch for freshness.
- Crunch Factor: Add a sprinkle of chopped pecans or walnuts to the stuffing for a delightful textural contrast.
- Bacon Wrap: Because bacon makes everything better, **IMO**. Wrap your stuffed chicken in a couple of slices of thin bacon or prosciutto before searing and baking. Talk about next level!
FAQ (Frequently Asked Questions)
- Can I prep this ahead of time? Absolutely! Stuff the chicken, cover it, and pop it in the fridge up to a day in advance. Just let it come to room temperature for about 15-20 minutes before searing.
- What if I don’t have an oven-safe skillet? No problem! Sear the chicken in a regular pan on the stovetop, then carefully transfer it to a baking dish to finish in the oven. Easy peasy.
- How do I know the chicken is cooked through? The best way is with a meat thermometer. It should read 165°F (74°C) in the thickest part. Otherwise, cut into the thickest part – the juices should run clear, and the meat should be opaque.
- Can I use frozen chicken breasts? Yes, but please, please, **please** thaw them completely first! Pat them dry thoroughly before seasoning and stuffing.
- What should I serve with this? Roasted asparagus, green beans, a simple side salad, wild rice, or creamy mashed potatoes would all be fantastic pairings!
- I hate cranberries! What else can I use? Dried cherries are a great sweet-tart alternative, or even finely chopped apple for a fresh crunch.
Final Thoughts
See? Told ya it was easy! You just created a restaurant-quality meal without breaking a sweat (or the bank). Now go forth and impress someone – or, more importantly, yourself – with your new culinary skills. You’ve earned it! Seriously, pat yourself on the back, grab a fork, and enjoy every single delicious bite. Don’t forget to send me pics!