So, you’re staring at a package of chicken breasts, dreaming of a delicious, juicy meal, but also dreading the “how long do I actually cook this without turning it into a rubber puck?” conundrum, huh? Been there, bought the T-shirt (it says “I overcooked chicken and now I’m sad”).
Fear not, my friend! We’re about to conquer the humble chicken breast on the stove top. No fancy gadgets, no hour-long marinades (unless you’re feeling extra spicy, which is cool too). Just pure, unadulterated, perfectly cooked chicken, ready to be the star of your salad, sandwich, or just, you know, your face. Let’s do this!
Why This Recipe is Awesome
Why is this method the bee’s knees? Oh, let me count the ways:
- It’s faster than deciding what to binge-watch next. Seriously.
- It requires minimal clean-up. Because who likes doing dishes? Not me, that’s who.
- It’s practically **idiot-proof**. And I say that with love, having overcooked more chicken than I care to admit in my early culinary adventures. If I can do it, you can *definitely* do it.
- You get a beautiful, golden-brown crust. Hello, flavor town!
- It’s versatile. This chicken will be your blank canvas for a million different meals.
Ingredients You’ll Need
Alright, gather your troops! Here’s what you’ll need to transform those pale poultry slabs into golden goodness:
- **1-2 Boneless, Skinless Chicken Breasts:** The star of our show. Try to get them roughly the same thickness for even cooking, or you can *gently* pound them to an even thickness later.
- **1-2 tablespoons Olive Oil:** Or any high-heat cooking oil you prefer. Avocado oil, grapeseed oil – whatever floats your non-stick boat.
- **Salt & Freshly Ground Black Pepper:** The OGs. Don’t be shy; they bring out the chicken’s best qualities.
- **Optional Flavor Boosters (but highly recommended!):**
- **Garlic Powder:** Because garlic makes everything better. It’s science.
- **Smoked Paprika:** Adds a lovely color and a hint of smoky goodness.
- **Onion Powder:** A subtle hero for savory depth.
Step-by-Step Instructions: The Path to Perfection
Follow these steps, and you’ll be a chicken whisperer in no time:
- **Prep Your Chicken:** Pat those chicken breasts dry with paper towels. Seriously, this is **CRUCIAL** for that golden crust. Wet chicken steams, dry chicken sears. Then, if they’re super thick (over an inch), place them between two sheets of plastic wrap and pound them gently with a meat mallet (or a heavy pan) until they’re about 3/4 to 1 inch thick. This ensures even cooking.
- **Season Generously:** Drizzle a little olive oil over the chicken, then sprinkle both sides with salt, pepper, and any of your chosen flavor boosters (garlic powder, paprika, etc.). Don’t be afraid to give them a good rub-down.
- **Heat Your Pan:** Place a large skillet (cast iron or stainless steel works best for searing) over medium-high heat. Let it get nice and hot for about 2-3 minutes. A hot pan prevents sticking and gives you that gorgeous sear. Add your tablespoon or two of oil, swirling to coat the bottom.
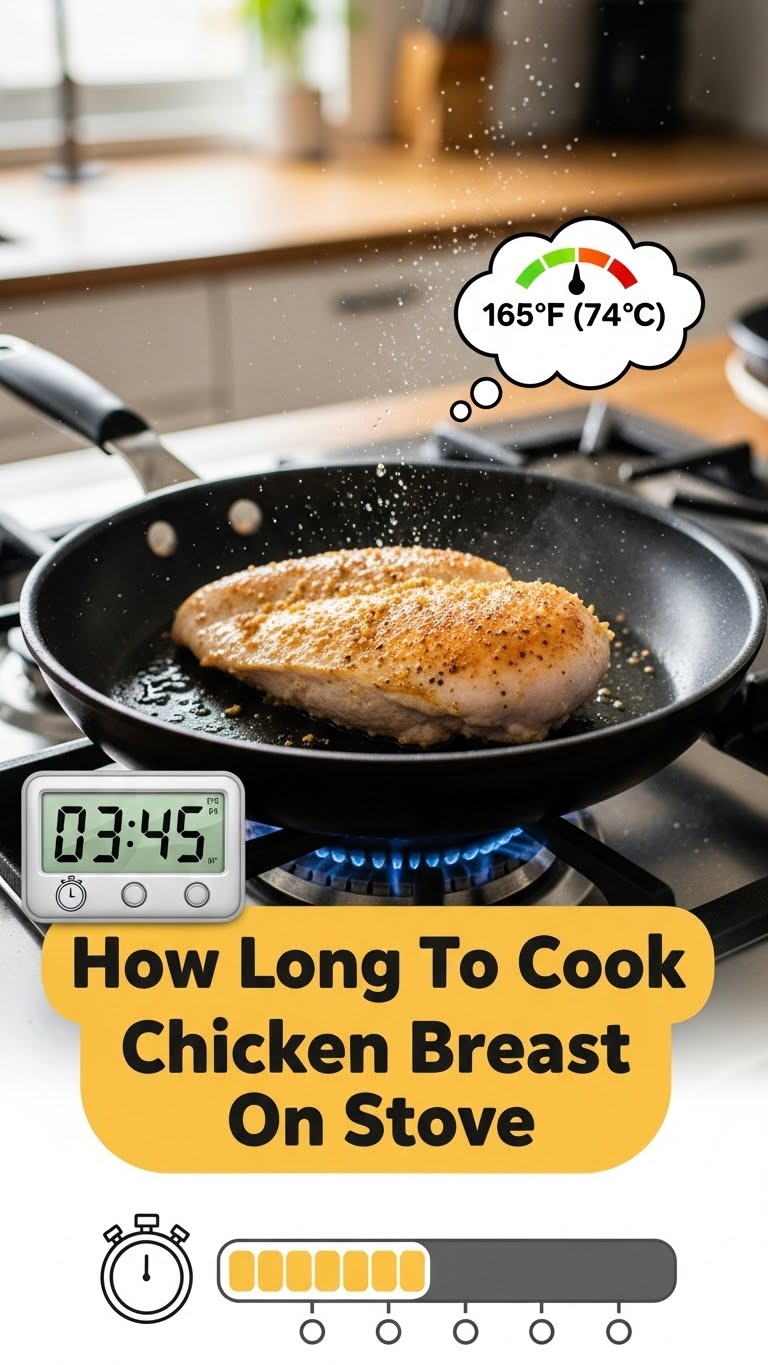
- **Sear Away!** Carefully place the seasoned chicken breasts in the hot pan. Don’t overcrowd the pan – if you’re cooking more than two, do them in batches. Let them cook undisturbed for **5-7 minutes** on the first side. You’re looking for a beautiful, golden-brown crust.
- **Flip and Finish:** Flip the chicken breasts over. Reduce the heat slightly to medium. Continue cooking for another **5-7 minutes** on the second side. The exact time depends on the thickness of your chicken and how hot your pan is.
- **Check for Doneness:** The safest bet is an instant-read thermometer. Insert it into the thickest part of the chicken; it should read **165°F (74°C)**. If you don’t have a thermometer (get one, seriously!), you can cut into the thickest part – the juices should run clear, and the meat should be opaque white all the way through.
- **Rest, You Deserve It!** Transfer the cooked chicken to a cutting board and let it rest for 5-10 minutes. This is super important! It allows the juices to redistribute, ensuring your chicken stays wonderfully moist. If you cut it too soon, all those delicious juices will run out, leaving you with dry chicken. Womp womp.
Common Mistakes to Avoid (aka How Not to Ruin Dinner)
We’ve all been there. Here are the pitfalls to sidestep:
- **Crowding the Pan:** Trying to cram too many chicken breasts into one pan is a one-way ticket to steamed chicken, not seared. Give them space, people!
- **Not Patting Dry:** Repeat after me: **Drier is better!** Wet chicken equals sad, grey chicken.
- **Flipping Too Soon:** Patience, grasshopper. Let that crust form. Resist the urge to poke and prod every 30 seconds.
- **Overcooking (The Cardinal Sin):** This is where dry, rubbery chicken is born. Get that thermometer! Or at least pay attention to those clear juices. **165°F (74°C)** is your magic number.
- **Skipping the Rest:** You’ve worked hard, so has your chicken. Give it a break! This 5-10 minute rest makes all the difference in moisture retention.
Alternatives & Substitutions (Get Creative!)
This recipe is super flexible. Here are some ways to shake things up:
- **Oil Swap:** Not feeling olive oil? Try avocado oil for a neutral flavor and high smoke point, or a tiny bit of butter at the end for extra richness (just watch the heat, butter burns faster!).
- **Seasoning Shenanigans:** Go wild! Cajun seasoning for a kick, Italian herbs for a Mediterranean vibe, lemon pepper for brightness, or even a simple garlic and herb blend. **IMO**, a little paprika always looks good.
- **Pan Prowess:** While cast iron and stainless steel are champions for searing, a good non-stick pan will work just fine too. Just don’t expect *quite* the same crust.
- **Add-ins:** Towards the end of cooking, throw in some sliced garlic, a pat of butter, and a sprig of rosemary or thyme to infuse extra flavor into the pan juices. Drizzle over the chicken before serving. Delish!
FAQ (Frequently Asked Questions)
- **”Do I really need to pound the chicken?”** Honestly, it helps a *ton* for even cooking, especially if your breasts are thick. Nobody wants one end dry and the other undercooked, right?
- **”What if my chicken is frozen?”** Whoa there, slow down! Always thaw your chicken completely in the fridge before cooking. Cooking from frozen on the stove top is a recipe for unevenly cooked, potentially unsafe, and definitely less delicious chicken. **FYI** – food safety first!
- **”Can I use boneless, skinless chicken thighs instead?”** Absolutely! Thighs are a bit more forgiving and harder to overcook. They might need a couple more minutes per side due to their slightly different structure and fat content, but the method is largely the same.
- **”My chicken stuck to the pan! What went wrong?”** Two main culprits: either your pan wasn’t hot enough, or you tried to flip it too soon before a crust had properly formed. A good sear means it’ll release easily when ready.
- **”How do I know it’s 165°F without a thermometer?”** While I still strongly recommend a thermometer, if you *must* eyeball it, cut into the thickest part. The meat should be opaque white all the way through, and the juices should run completely clear, not pink or cloudy. If there’s any pinkness, give it another minute or two.
- **”Can I add a sauce to this?”** Oh honey, yes! Once the chicken is out and resting, you can deglaze the pan with a splash of broth, white wine, or lemon juice, scrape up those delicious browned bits, and whisk in a little butter or cream for a quick pan sauce. Pure genius!
Final Thoughts
And there you have it! You’ve just mastered the art of cooking perfect chicken breast on the stove top. No more rubbery disappointments, just juicy, flavorful goodness. This skill is your new superpower, ready to elevate weeknight dinners or impress that special someone (or, let’s be real, just yourself).
Now go forth and cook, my friend! You’ve earned those bragging rights. Maybe even treat yourself to a little dance party while it rests. You’ve earned that too. Happy cooking!