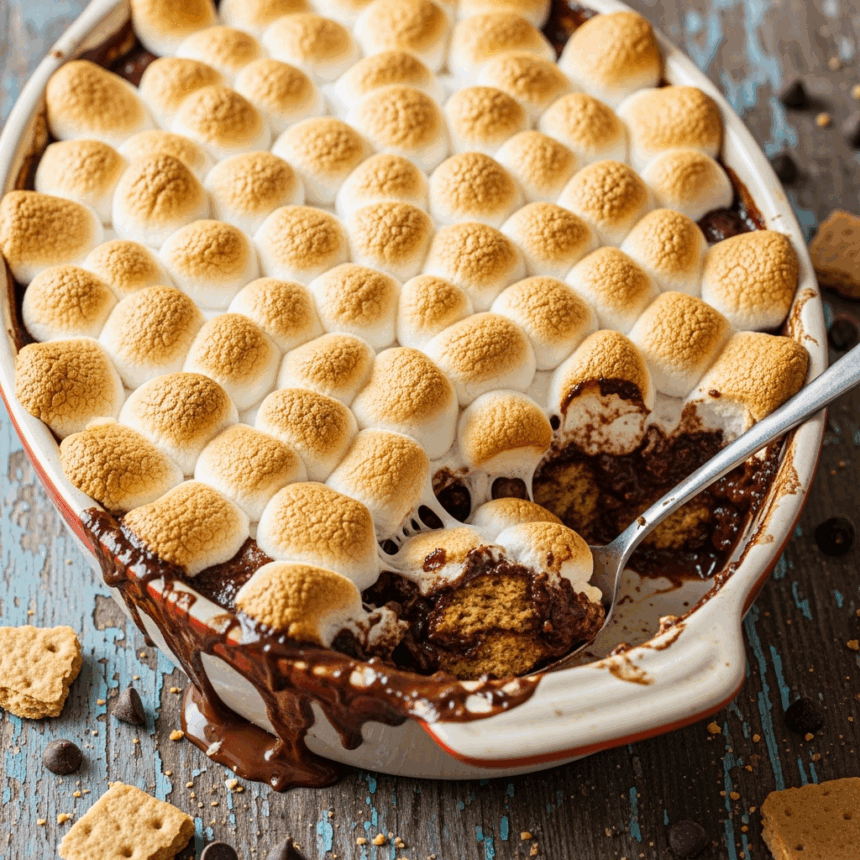
Listen up, dessert lovers! Remember when you were a kid, huddled around a campfire, getting sticky marshmallow all over your face while trying to make the perfect s’more? Well, what if I told you that you could recreate that magical experience without having to battle mosquitoes or smell like a bonfire for days? Enter: S’mores Casserole—the indoor-friendly, weather-proof way to get your graham cracker-chocolate-marshmallow fix!
Why This Recipe is Awesome
First off, this S’mores Casserole is basically fool-proof. Seriously, unless you literally walk away and forget about it (which, fair—we’ve all been there), it’s nearly impossible to mess up. It’s also the perfect “I-need-something-impressive-looking-but-have-zero-energy” dessert for when friends come over unexpectedly.
Plus, it’s customizable! Want more chocolate? Go for it! Extra marshmallows? Who’s stopping you? It’s your kitchen kingdom! The best part? You’ll get that perfect gooey-on-the-inside, crispy-on-the-outside marshmallow texture that’s practically impossible to achieve over an actual campfire unless you’re some kind of s’mores whisperer.
Ingredients You’ll Need
Round up these basics:
- 2 cups graham cracker crumbs (about 14 full crackers, pulverized to their doom)
- ½ cup melted butter (the real stuff, not that “butter-adjacent” nonsense)
- ¼ cup sugar (because apparently graham crackers, chocolate, and marshmallows aren’t sweet enough?)
- 4 regular-sized Hershey’s chocolate bars (or 2 cups chocolate chips for rebels)
- 1 bag (10 oz) marshmallows (the big ones, not those mini imposters—unless that’s your thing)
- A pinch of salt (to make you feel like this is somehow sophisticated)
Step-by-Step Instructions
- Preheat your oven to 350°F (175°C). Don’t skip this step! I know you want to, but resist the urge.
- Crush those graham crackers like they personally offended you. You can use a food processor, or go caveman-style with a ziplock bag and rolling pin therapy session.
- Mix graham cracker crumbs, melted butter, sugar, and that pretentious pinch of salt in a bowl until it looks like wet sand (appetizing description, I know).
- Press this mixture into an 8×8 baking dish. Use the bottom of a measuring cup to really compact it—we’re building a foundation here, people!
- Break up chocolate bars and scatter them evenly over your graham cracker layer. Be honest with yourself about how much you’re sampling during this process.
- Cover the chocolate with a single layer of marshmallows. They’ll expand, so don’t go marshmallow-crazy yet (save that for your therapist).
- Bake for 10-12 minutes or until the marshmallows turn that perfect golden brown. Watch it like a hawk! The difference between “perfectly toasted” and “charred beyond recognition” is approximately 47 seconds.
Common Mistakes to Avoid
Let’s save you from yourself with these tips:
- Walking away during baking. Those marshmallows will go from “golden perfection” to “science experiment gone wrong” faster than you can say “where’s the fire extinguisher?”
- Not pressing the graham cracker crust firmly enough. Unless you enjoy playing “find the loose crumbs” all over your kitchen floor.
- Using cold butter. Melted means melted! Your crust will be sadder than a rainy camping trip if you ignore this.
- Trying to cut it while it’s hot. I get it, you’re impatient. We all are. But you’ll end up with a sticky, magnificent mess if you don’t let it cool a bit.
Alternatives & Substitutions
Because we all know you’ll probably need to improvise:
Chocolate options: Dark chocolate works for the sophisticated palate. White chocolate for the controversial souls. Reese’s cups for the peanut butter enthusiasts. Mint chocolate for the people who enjoy toothpaste-flavored desserts (no judgment…okay, slight judgment).
Graham cracker alternatives: Digestive biscuits work well (hello, international friends). Oreo crumbs for chocolate overachievers. Vanilla wafers for the graham-opposed.
Dietary needs: Gluten-free graham crackers exist and work just fine. Vegan marshmallows are a thing now (what a time to be alive!). For dairy-free, coconut oil can replace butter, though you might need slightly less.
FAQ (Frequently Asked Questions)
Can I make this ahead of time?
Technically yes, practically no. The magic of s’mores is in that fresh-from-the-heat gooeyness. Make the crust ahead if you must, but add chocolate and marshmallows just before baking.
How do I store leftovers?
Leftovers? What leftovers? But if you somehow possess superhuman restraint, cover with plastic wrap and refrigerate for up to 3 days. Microwave for 15-20 seconds to revive some of that gooey texture.
Can I make this in a microwave?
Are you trying to hurt me? No. Just…no. The oven gives you that irreplaceable toasty marshmallow top. The microwave gives you marshmallow foam that expands like something from a sci-fi movie.
Is this kid-friendly to make?
Kids can definitely help crush graham crackers and arrange marshmallows, but maybe keep them away from the hot oven part unless you’re prepared for a sticky situation (both literally and parentally).
Can I add fruit to make this “healthy”?
Sure, and I can also call myself a marathon runner after walking to the mailbox. But if you insist, sliced strawberries or bananas between the chocolate and marshmallow layer are actually pretty delicious.
Final Thoughts
Look at you, about to make the easiest yet most impressive indoor dessert known to mankind! Whether you’re trying to recapture childhood campfire glory or just looking for something to inhale while binge-watching your latest show obsession, this S’mores Casserole has your back.
The beauty of this dessert is that it’s meant to be imperfect—just like actual campfire s’mores. So even if your marshmallows get a little too toasty or your chocolate distribution isn’t mathematically precise, it’ll still taste amazing. Because let’s be real—it’s pretty hard to mess up the holy trinity of graham crackers, chocolate, and marshmallows.
Now go forth and create that gooey masterpiece! Your inner child (and your actual adult taste buds) will thank you. Just remember to save me a corner piece—that’s where all the crispy marshmallow edges live!
