So you’re craving something tasty but too lazy to spend forever in the kitchen, huh? Same. We’ve all been there: staring into the abyss of the fridge, debating between takeout and, well, *more* takeout. But what if I told you there’s a culinary superhero that swoops in to save your evening, your dishes, and your sanity? Enter the magnificent, the glorious, the unbelievably easy Sheet Pan Chicken Breast!
Why This Recipe is Awesome
Oh, honey, where do I even begin? This isn’t just a recipe; it’s a lifestyle choice. It’s the culinary equivalent of wearing pajamas all day – comfortable, low-effort, and surprisingly chic. Here’s the lowdown on why you’re about to fall head over heels:
- One Pan Wonder: Seriously, just one sheet pan. That means less scrubbing, more Netflix. What’s not to love?
- Idiot-Proof: I’m not saying *you’re* an idiot, but this recipe is so forgiving, even I didn’t manage to mess it up. It’s perfect for beginners, tired humans, and anyone who prefers their kitchen skills to be minimal.
- Customizable AF: Got some sad-looking veggies in the crisper drawer? Toss ’em in! This recipe is basically a blank canvas for whatever flavors and produce you’re feeling.
- Healthy-ish & Hearty: Lean protein, tons of veggies… you’re basically a health guru. But it’s also satisfying enough to silence even the most stubborn “I’m still hungry” murmurs.
- Speedy Gonzales: From prep to plate, we’re talking under an hour. Perfect for those nights when your stomach thinks 5 PM is 9 PM.
Ingredients You’ll Need
Gather your troops! No fancy-pants ingredients here, just good old-fashioned deliciousness.
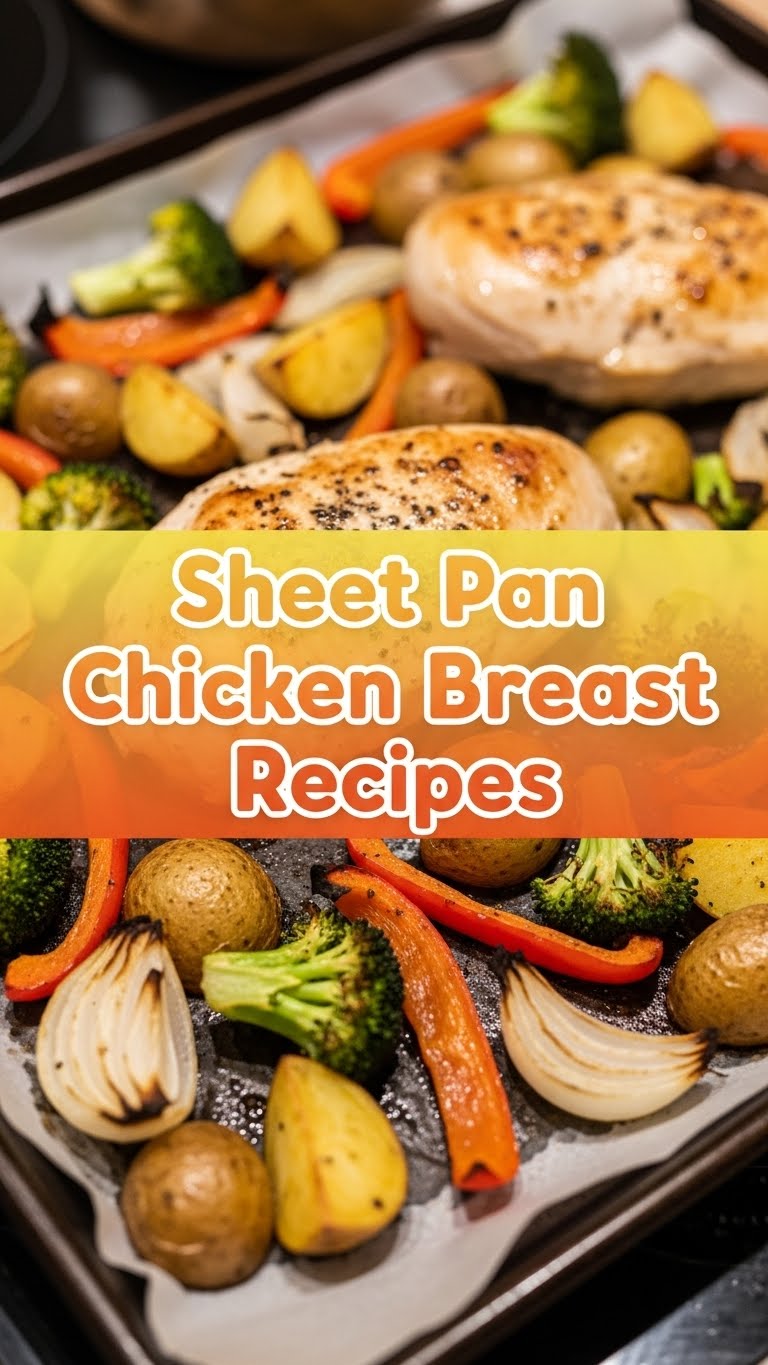
- Chicken Breasts: 1-1.5 lbs boneless, skinless chicken breasts. The flatter, the better for even cooking. Give ’em a little love tap with a rolling pin if they’re chonky.
- Assorted Veggies: About 4-5 cups of your favorites, chopped into roughly 1-inch pieces. Think broccoli florets, bell peppers (any color!), red onion, zucchini, cherry tomatoes, asparagus, or even sweet potato cubes (cut them smaller, they’re dense!).
- Olive Oil: 2-3 tablespoons. Enough to get everything cozy and coated.
- The Flavor Squad (Seasonings):
- 1 tsp garlic powder
- 1 tsp onion powder
- 1 tsp paprika (smoked paprika if you’re feeling fancy)
- ½ tsp dried oregano
- ½ tsp dried thyme
- Salt and freshly ground black pepper, to taste (don’t be shy!)
- Optional Flavor Boosters: Lemon wedges for serving, fresh parsley or cilantro for garnish, a sprinkle of red pepper flakes if you like a little kick.
Step-by-Step Instructions
- Preheat & Prepare: Crank that oven to 400°F (200°C). While it’s getting toasty, line a large sheet pan with parchment paper or foil for easy cleanup. Trust me on this; your future self will thank you.
- Chicken Prep: Pat those chicken breasts dry with a paper towel. This helps them get a nice sear instead of steaming. If they’re super thick, slice them in half horizontally or pound them slightly so they cook evenly with the veggies.
- Veggie Chop-Chop: Get all your chosen veggies chopped into similar-sized pieces. We’re aiming for even cooking here, folks! Nobody wants burnt broccoli next to raw potato.
- Seasoning Party: In a large bowl (or directly on your sheet pan, you rebel!), combine the chicken and all the chopped veggies. Drizzle with olive oil and sprinkle generously with the garlic powder, onion powder, paprika, oregano, thyme, salt, and pepper. Use your hands to toss everything together until it’s beautifully coated.
- Sheet Pan Spread: Arrange the seasoned chicken and veggies in a single layer on your prepared sheet pan. Give everything a little breathing room. Crowding is a no-go; it leads to steaming, not roasting!
- Roast Away! Pop that sheet pan into your preheated oven. Roast for 20-25 minutes, flipping the chicken and stirring the veggies halfway through.
- Check for Doneness: Your chicken is done when it reaches an internal temperature of 165°F (74°C). The veggies should be tender-crisp and slightly caramelized. Use a meat thermometer – it’s your best friend here!
- Rest & Serve: Once done, remove the pan from the oven. Let the chicken rest for 5 minutes before slicing; this keeps it juicy. Serve immediately with those optional lemon wedges and fresh herbs.
Common Mistakes to Avoid
Even the simplest recipes have their booby traps. Here’s how to sidestep them like a culinary ninja:
- Forgetting to Preheat the Oven: Rookie mistake! Your food deserves a warm welcome and an even cook. Putting food in a cold oven means it’ll take longer and cook unevenly.
- Crowding the Pan: It’s a sheet pan, not a sardine can! Overloading the pan means the veggies will steam instead of roast, leading to soggy disappointment instead of crispy goodness. Use two pans if you have too many ingredients.
- Not Pounding/Slicing Chicken: If your chicken breasts are super thick, they won’t cook at the same rate as your veggies. You’ll end up with either raw chicken or burnt veggies. **Even thickness is key!**
- Overcooking the Chicken: Dry chicken is a tragedy. Use that meat thermometer! 165°F and it’s done. Take it out!
- Ignoring the Rest Time: Letting the chicken rest for a few minutes allows the juices to redistribute, resulting in a much more tender and flavorful bite. Patience, grasshopper.
Alternatives & Substitutions
This recipe is your playground! Don’t be afraid to experiment.
- Chicken Swaps: Not a breast person? Boneless, skinless chicken thighs work beautifully too! Just remember they might need a few extra minutes to cook through.
- Veggie Variety: Almost any vegetable will work. Try sliced sweet potatoes or carrots (cut them thin!), mushrooms, green beans, or even small potatoes (again, cut small!). **IMO**, Brussels sprouts are a fantastic addition, getting deliciously crispy.
- Spice it Up: Ditch my seasoning mix and use your own favorite blend! Taco seasoning, Italian herbs, a touch of curry powder – go wild! A splash of soy sauce or balsamic glaze can also add a punch.
- Add-ins: Toss in some chickpeas for extra protein and texture. Sprinkle with feta or Parmesan cheese in the last 5 minutes of cooking for a cheesy finish.
FAQ (Frequently Asked Questions)
Got questions? I’ve got answers, delivered with a side of sass.
- Can I use frozen chicken breasts for this recipe? Well, technically yes, but please, for the love of all that is holy, **thaw them completely first**! Nobody wants a sheet pan full of watery, unevenly cooked chicken.
- My veggies and chicken cook at different rates sometimes. What gives? Great observation! Denser veggies like potatoes or carrots need more time. Either cut them smaller than everything else, or add them to the pan 5-10 minutes before you add the chicken and quicker-cooking veggies. **FYI**, this is a common kitchen conundrum!
- How do I prevent everything from sticking to my sheet pan? Ah, the age-old dilemma! The answer is simple: **parchment paper or aluminum foil**. If using foil, give it a good spray with non-stick cooking spray. Your cleanup will be a breeze!
- Can I add a sauce to this? Absolutely! But generally, you’ll want to drizzle sauces *after* cooking, or use them as a marinade beforehand. If you add a thick sauce too early, it can burn or prevent proper browning. Think a drizzle of pesto or a squeeze of sriracha mayo at the end.
- How long do leftovers last? Store any glorious leftovers in an airtight container in the fridge for up to 3-4 days. Reheat gently in the microwave or a warm oven to keep the chicken from drying out.
- What kind of sheet pan should I use? A standard half-sheet pan (18×13 inches) is perfect for this. It gives everything enough space to roast without crowding. If you only have smaller ones, just use two!
- My oven tends to cook unevenly. Any tips? Ovens can be quirky, like certain exes. Try rotating the sheet pan halfway through cooking to ensure even browning. You can also experiment with different rack positions – higher for more browning, lower for more even heat.
Final Thoughts
See? I told you it was easy! You’ve just unlocked a dinner superpower that’s going to save you on countless busy nights. This sheet pan chicken breast recipe isn’t just food; it’s freedom from endless dishes and complicated steps. Go forth and conquer your dinner dreams! Now go impress someone – or just yourself – with your newfound culinary skills. You’ve earned it!