So you’re craving something ridiculously tasty but also too lazy to spend an eternity in the kitchen, huh? Welcome to the club! We’ve all been there, staring into the fridge, dreaming of something crispy, juicy, and utterly satisfying that practically cooks itself. Well, guess what? Today, we’re making fried chicken breast that’s so easy, even your dog could probably supervise (just kidding, keep Fido away from the hot oil!). Get ready to impress yourself, because this recipe is a game-changer for your weeknight dinner dilemma.
Why This Recipe is Awesome
Okay, let’s be real: who doesn’t love fried chicken? The problem is, sometimes it feels like a project only a seasoned chef (pun intended!) can tackle. Not this one, my friend. This recipe is your fast-track ticket to golden-brown, crunchy perfection without the drama. It’s **idiot-proof**, honestly. I’ve made it after a long day, when my brain cells were already checked out, and it still came out amazing. It’s quick, uses super simple ingredients you probably already have, and delivers maximum flavor for minimum effort. Plus, it’s chicken breast, so you can tell yourself it’s practically health food, right? (Don’t quote me on that, but a little self-deception never hurt anyone.)
Ingredients You’ll Need
- **2 Boneless, Skinless Chicken Breasts:** The stars of our show. Thin-sliced works best for quick cooking. If they’re thicc, give ’em a good whack with a meat mallet (or a rolling pin, or a heavy pan, whatever you got!).
- **1 Cup All-Purpose Flour:** The base of our crispy coating. No fancy stuff needed.
- **1 Teaspoon Salt:** Because bland food is a crime.
- **1/2 Teaspoon Black Pepper:** Gives it that little kick. Freshly ground is always better, but who are we kidding, pre-ground works just fine.
- **1 Teaspoon Paprika:** For a gorgeous color and a hint of smoky sweetness. Don’t skip this!
- **1/2 Teaspoon Garlic Powder:** Essential flavor booster.
- **1 Large Egg:** Our glue. Don’t worry, it’s just one.
- **1/4 Cup Milk (any kind works):** To thin out the egg and make a lovely wash.
- **2-3 Cups Vegetable Oil (or Canola, Peanut, Grapeseed):** For frying. Don’t even *think* about olive oil for deep frying, unless you enjoy smoke alarms and a bitter taste.
Step-by-Step Instructions
- **Prep the Chicken Like a Pro:** If your chicken breasts are super thick, place them between two sheets of plastic wrap and pound them down to about ½-inch thickness. This ensures even cooking and max crispiness. Cut them in half or into smaller cutlets if you like.
- **Set Up Your Breading Station:** Grab two shallow dishes. In the first dish, whisk together the flour, salt, pepper, paprika, and garlic powder. In the second dish, whisk the egg and milk until well combined. This is your “dredging” assembly line.
- **Coat ‘Em Up:** Take one chicken piece and dredge it thoroughly in the flour mixture, making sure it’s completely coated. Shake off any excess. Next, dip it into the egg wash, letting any extra drip off. Finally, back into the flour mixture for a second, glorious coat. **Press the flour onto the chicken firmly** to make sure it sticks! Set the coated chicken on a clean plate or wire rack while you repeat with the rest.
- **Heat the Oil:** Pour 1 to 1.5 inches of your chosen oil into a large, heavy-bottomed skillet (cast iron is amazing here!). Heat it over medium-high heat until it reaches around 350-375°F (175-190°C). Don’t have a thermometer? Drop a tiny pinch of flour in—if it sizzles and floats immediately, you’re good to go!
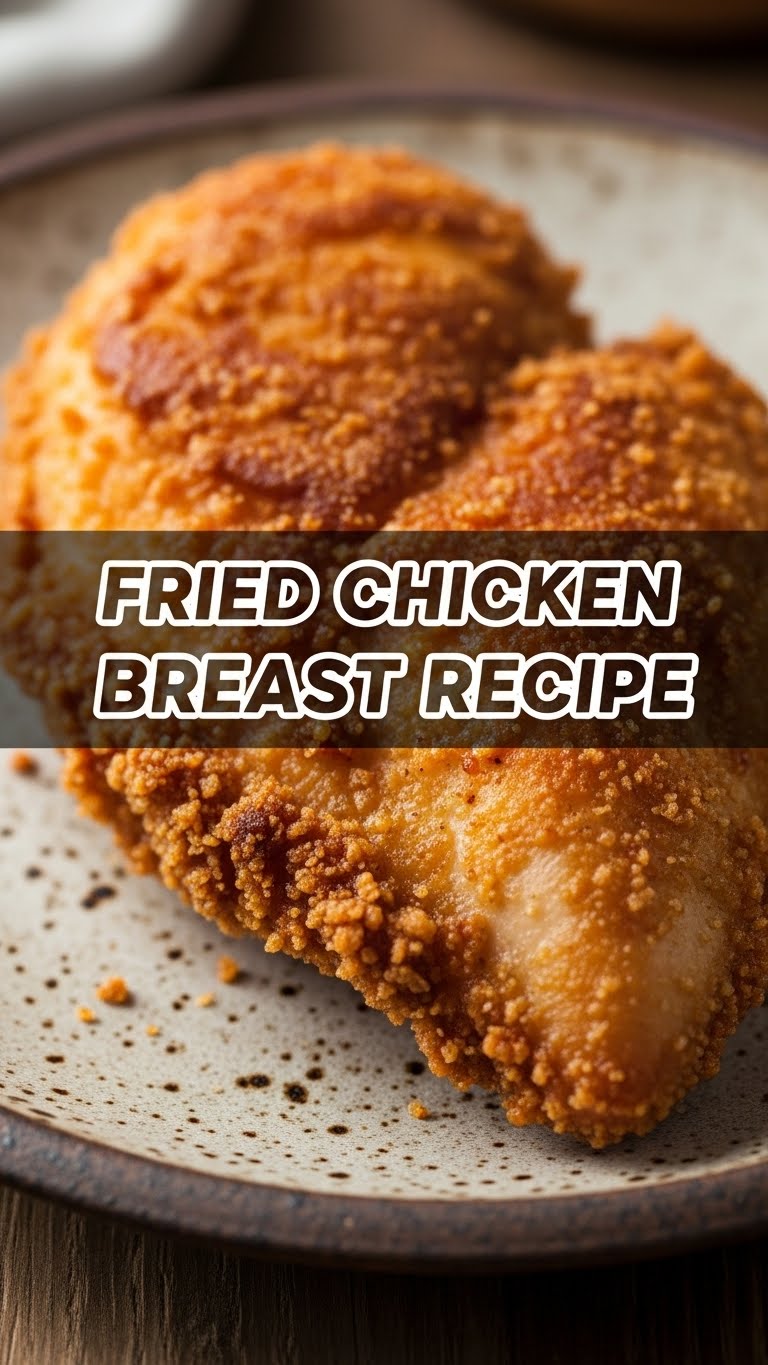
- **Fry ‘Em Golden:** Carefully place 1-2 chicken pieces into the hot oil, making sure not to overcrowd the pan. We want sizzling, not stewing! Fry for about 4-6 minutes per side, or until they’re beautifully golden brown and the internal temperature reaches 165°F (74°C).
- **Drain and Devour:** Once cooked, use tongs to transfer the fried chicken to a wire rack set over paper towels. This helps drain excess oil and keeps that crust super crispy. Let them rest for a couple of minutes before serving.
Common Mistakes to Avoid
- **Overcrowding the Pan:** This is a biggie! If you put too many pieces in at once, the oil temperature drops, and your chicken will soak up oil instead of getting crispy. We want fried, not greasy, folks!
- **Not Seasoning Enough:** Remember, chicken is a blank canvas. If you don’t season your flour mixture well, you’ll end up with a bland crust. **Don’t be shy with the spices!**
- **Cooking on Too Low/High Heat:** Too low and your chicken gets oily. Too high and the outside burns before the inside cooks through. Aim for that sweet spot of 350-375°F.
- **Skipping the Pounding:** If your chicken breasts are unevenly thick, you’ll have parts that are overcooked and dry, and parts that are undercooked. A little pounding goes a long way.
Alternatives & Substitutions
Feeling adventurous or missing an ingredient? No worries, we can totally improvise!
- **Spices:** Not a paprika fan? Swap it for chili powder, smoked paprika, or even a dash of cayenne for some heat. Love herbs? Add some dried thyme or oregano to your flour mix. Make it your own, you culinary genius!
- **Milk:** No cow’s milk? Almond milk, soy milk, even water in a pinch (though milk adds a nice richness) will work for the egg wash.
- **Flour:** While all-purpose is the easiest, you can experiment with half all-purpose, half cornstarch for an even crispier crust. Gluten-free? Use your favorite GF all-purpose flour blend.
- **Cut of Chicken:** This technique works great for chicken thighs too, just adjust cooking time (they usually take a bit longer and can handle slightly higher temps). Why limit yourself?
FAQ (Frequently Asked Questions)
- **Do I really need a thermometer for the oil?** Technically, no, you *can* eyeball it with the flour test. But seriously, a cheap thermometer will save you a lot of guesswork and prevent burnt or oily chicken. **It’s a small investment for crispy greatness.**
- **Can I bake this instead?** While you *can* bake breaded chicken, it won’t give you that glorious, shatteringly crispy fried texture. It’s more of a “crispy baked” chicken. Different beast, still tasty, but not what we’re going for here.
- **How do I get an extra crispy crust?** **Double dredging** (flour-egg-flour) is key, as is ensuring your oil is at the right temperature. Some folks even add a tablespoon of baking powder to their flour mix for an extra airy crunch, FYI!
- **What’s the best oil to use?** Vegetable, canola, peanut, or grapeseed oil are your best bets. They have high smoke points, meaning they can get hot enough to fry without burning or giving your food a weird taste. Don’t use olive oil; it’ll smoke up your kitchen and taste terrible.
- **Can I make these ahead of time?** You *can*, but honestly, fried chicken is best eaten fresh off the pan. If you must, reheat them in an oven or air fryer to bring back some crispiness, but don’t expect the same level of perfection.
- **Why did my chicken get soggy?** Probably too low oil temp, overcrowding the pan, or not letting them drain on a wire rack after frying. Or maybe you just left them sitting out for too long. No judgment, it happens!
Final Thoughts
So there you have it! Your new go-to recipe for fried chicken breast that’s fast, flavorful, and ridiculously easy. No more takeout cravings when you can whip up something this good in your own kitchen. This isn’t just a meal; it’s a confidence booster. Now go impress someone—or yourself—with your new culinary skills. You’ve earned it!